- 更新日: 2022年05月31日
- 公開日: 2020年05月01日
【JavaScriptを好きになろう】JavaScriptで横スクロールゲームを作ろう(コード付き)
ゲームを通して JavaScript と触れ合う 「JavaScriptを好きになろう」 シリーズ。
今回は JavaScript を使って横スクロールゲームを作成。チュートリアルに使用するゲームは、 iOS や Android などでも有名な「Flappy Bird」です。
再配布可能なプログラムを参考にし、横スクロール型の Flappy Bird を作成してみました。
参考にしたプログラム: GitHub/bhauman
【JavaScriptを好きになろう】JavaScriptで横スクロールゲームを作ろう
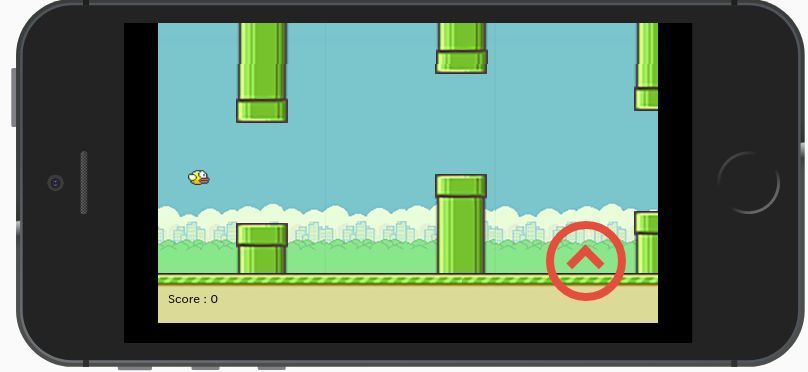
今回の目標:Flappy Bird

https://pythonchannel.com/myapp/flappy/
参考にしたベースプログラムは、縦スクリーンの横スクロールでしたが、見にくいため上図のような横スクリーン型に変更。またスマホの場合はキーボード操作できないため、専用ボタンを設置し、プレイ可能に。
その他にもいろいろ工夫した点ありますが、まずは一度上記 URL でテストしてみて下さい。
iOS バージョン 12系 の方は、画面がフルスクリーンにならないので少々遊びにくいと思います。 iOS 13系ではフルスクリーン確認できていますので、アップデートしていない方はこの機会にどうぞ。尚、 iPhone 5s は バージョン 13に上げられないので.... フルスクリーンはご了承ください。
それでは横スクロール型ゲームの作成手順をご紹介していきます。
キャンバスの用意

上図のコードを今確認する
<!DOCTYPE html>
<html lang="ja">
<head>
    <meta charset="UTF-8" />
    <title>Flappy Bird</title>
    <meta name="viewport" content="width=device-width, user-scalable=no">
    <style>
    canvas{
        background-color:#eee;
    }
    </style>
</head>
<body>
<canvas id="canvas" width="500" height="300"></canvas>
</body>
</html>
今回は JavaScript を使用して、ブラウザ上でプレイできる環境を作りますので、 HTML の <canvas> を使用します。
端末サイズに合わせて <canvas> サイズを変える方法もありますが、今回は Flappy Bird の鳥が上下に動きますので、なるべく仕組みをシンプルにするためベースの <canvas> サイズは "固定" サイズでいきます。
そして <canvas> サイズは、スマホ使用を想定して、画面サイズの小さい iPhone5 をベースにセット。iphone5 は、 横 568、 縦 320 という画面サイズなので下記のように canvas をセット、
<canvas id="canvas" width="500" height="300"></canvas>

この canvas をベースに、背景画像や Flappy Birdを加え、ゲームできるようにプログラムをセットしていきます。
現役エンジニアからデザインツールの使い方やWeb制作を学ぶならCodeCampのWebデザインマスターコースがおすすめ!
ジャンプボタンの設置
上図のコードを今確認する(非レスポンシブ・ボタン)
<!-- canvas + button not responsive -->
<!DOCTYPE html>
<html lang="ja">
<head>
    <meta charset="UTF-8" />
    <title>Flappy Bird ボタン設置(端末関係なくボタン表示)</title>
    <meta name="viewport" content="width=device-width, user-scalable=no">
    <style>
    canvas{
        background-color:#eee;
    }
    body{
        max-width:900px;
        margin:0 auto;
        text-align:center;
    }
    .button {
        display: inline-block;
        vertical-align: middle;
        text-align:center;
        margin:32px;
    }
    .button div {
        display: inline-block;
        border-radius: 50%;
    }
    .button div:hover .up{
        border: 0.5em solid #e74c3c;
    }
    .button div:hover .up:after {
        border-top: 0.5em solid #e74c3c;
        border-right: 0.5em solid #e74c3c;
    }
    .up {
        display: inline-block;
        width: 4em;
        height: 4em;
        border: 0.5em solid #333;
        border-radius: 50%;
        margin-right: 1.5em;
    }

    .up:after {
        content: '';
        display: inline-block;
        margin-top: 1.3em;
        /*margin-left: 0.6em;*/
        width: 1.2em;
        height: 1.2em;
        border-top: 0.5em solid #333;
        border-right: 0.5em solid #333;
        -moz-transform: rotate(-45deg);
        -webkit-transform: rotate(-45deg);
        transform: rotate(-45deg);
    }

    /*canvasの上にボタンをフロート*/
    .content{
        display:inline-block;
        position:relative;
    }
    .content div {
        position:absolute;
        bottom:5px;
        right:5px;
    }
    </style>
</head>
<body>
<div class="content">
    <canvas id="canvas" width="500" height="300"></canvas>
    <div id="upButton" class="button">
        <div>
            <span class="up"></span>
        </div>
    </div>
</div>
</body>
</html>
上図のコードを今確認する(レスポンシブ対応・ボタン)
<!-- canvas + button responsive -->
<!DOCTYPE html>
<html lang="ja">
<head>
    <meta charset="UTF-8" />
    <title>Flappy Bird ボタン設置</title>
    <meta name="viewport" content="width=device-width, user-scalable=no">
    <style>
    canvas{
        background-color:#eee;
    }
    body{
        max-width:900px;
        margin:0 auto;
        text-align:center;
    }
    .button {
        display: none;
        vertical-align: middle;
        text-align:center;
        margin:32px;
    }
    .button div {
        display: inline-block;
        border-radius: 50%;
    }
    .button div:hover .up{
        border: 0.5em solid #e74c3c;
    }
    .button div:hover .up:after {
        border-top: 0.5em solid #e74c3c;
        border-right: 0.5em solid #e74c3c;
    }
    .up {
        display: inline-block;
        width: 4em;
        height: 4em;
        border: 0.5em solid #333;
        border-radius: 50%;
        margin-right: 1.5em;
    }

    .up:after {
        content: '';
        display: inline-block;
        margin-top: 1.3em;
        /*margin-left: 0.6em;*/
        width: 1.2em;
        height: 1.2em;
        border-top: 0.5em solid #333;
        border-right: 0.5em solid #333;
        -moz-transform: rotate(-45deg);
        -webkit-transform: rotate(-45deg);
        transform: rotate(-45deg);
    }

    /*canvasの上にボタンをフロート*/
    .content{
        display:inline-block;
        position:relative;
    }
    .content div {
        position:absolute;
        bottom:5px;
        right:5px;
    }
    /*canvasの上にボタンをフロート おわり*/
    @media (max-width:900px){
        .button {
            /*display: inline-block;*/
            display: inline-block;
            vertical-align: middle;
            text-align:center;
            margin:32px;
        }
    }
    </style>
</head>
<body>
<div class="content">
    <canvas id="canvas" width="500" height="300"></canvas>
    <div id="upButton" class="button">
        <div>
            <span class="up"></span>
        </div>
    </div>
</div>
</body>
</html>
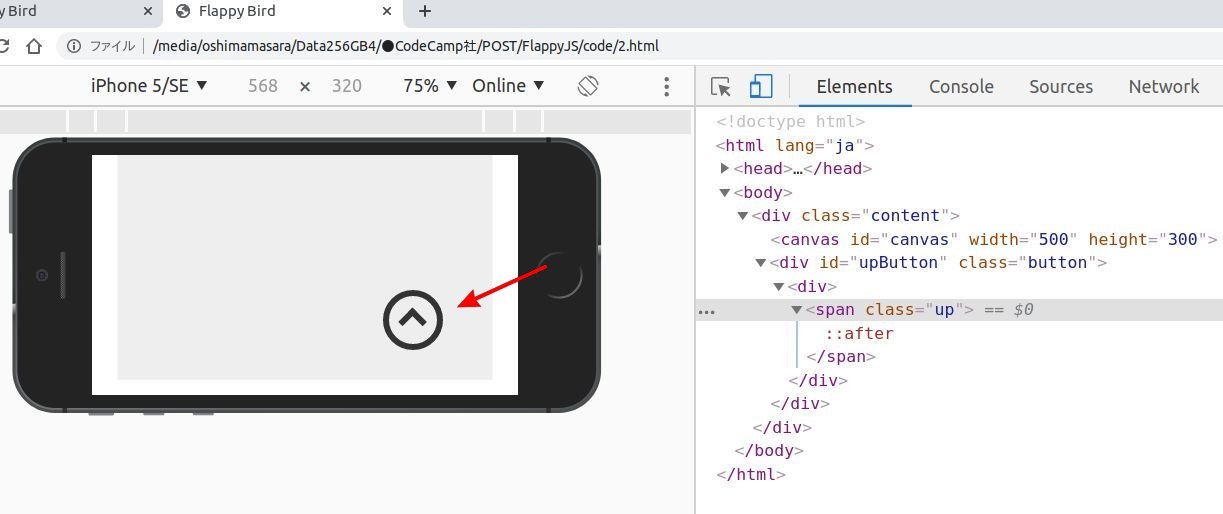
直ぐにでもゲームの背景やキャラを設置したいところですが、スマホ利用を想定して専用のアクションボタンを用意しておきます。
ボタンの設置方法はいろいろあると思いますが、今回は canvas の右下にボタンをラップする形で設置。そしてこのボタンはスマホ利用時のみ必用となり、パソコン使用時はいらないので @media でボタンを表示・非表示切り替えられるようにセット。

パソコン画面の方は、レイアウトが素っ気ないですが、今回はそのまま進めます。
パーツの設置
今回の横スクロールに必用なパーツは以下の通り。

上図のコードを今確認する
<!--
canvas + button responsive
parts image
-->
<!DOCTYPE html>
<html lang="ja">
<head>
    <meta charset="UTF-8" />
    <title>Flappy Bird</title>
    <meta name="viewport" content="width=device-width, user-scalable=no">
    <style>
    canvas{
        background-color:#eee;
    }
    body{
        max-width:900px;
        margin:0 auto;
        text-align:center;
    }
    .button {
        display: none;
        vertical-align: middle;
        text-align:center;
        margin:32px;
    }
    .button div {
        display: inline-block;
        border-radius: 50%;
    }
    .button div:hover .up{
        border: 0.5em solid #e74c3c;
    }
    .button div:hover .up:after {
        border-top: 0.5em solid #e74c3c;
        border-right: 0.5em solid #e74c3c;
    }
    .up {
        display: inline-block;
        width: 4em;
        height: 4em;
        border: 0.5em solid #333;
        border-radius: 50%;
        margin-right: 1.5em;
    }

    .up:after {
        content: '';
        display: inline-block;
        margin-top: 1.3em;
        /*margin-left: 0.6em;*/
        width: 1.2em;
        height: 1.2em;
        border-top: 0.5em solid #333;
        border-right: 0.5em solid #333;
        -moz-transform: rotate(-45deg);
        -webkit-transform: rotate(-45deg);
        transform: rotate(-45deg);
    }

    /*canvasの上にボタンをフロート*/
    .content{
        display:inline-block;
        position:relative;
    }
    .content div {
        position:absolute;
        bottom:5px;
        right:5px;
    }
    /*canvasの上にボタンをフロート おわり*/
    @media (max-width:900px){
        .button {
            /*display: inline-block;*/
            display: inline-block;
            vertical-align: middle;
            text-align:center;
            margin:32px;
        }
    }
    </style>
</head>
<body>
<div class="content">
    <canvas id="canvas" width="500" height="300"></canvas>
    <div id="upButton" class="button">
        <div>
            <span class="up"></span>
        </div>
    </div>
</div>

<script>
    var cvs = document.getElementById("canvas");
    var ctx = cvs.getContext("2d");

    var bg = new Image(); //背景
    var bird = new Image(); //鳥
    var fg = new Image(); //地面
    var pipeNorth = new Image(); //ドカン上
    var pipeSouth = new Image(); //ドカン下

    bg.src = "bg.png";
    bird.src = "bird.png";
    fg.src = "fg.png";
    pipeNorth.src = "pipeNorth.png";
    pipeSouth.src = "pipeSouth.png";

    function draw(){
        ctx.drawImage(bg,0,0);
        ctx.drawImage(bird,30,100);
        ctx.drawImage(fg,0,260);
        ctx.drawImage(pipeNorth,300,0);
        ctx.drawImage(pipeSouth,300,200);

        requestAnimationFrame(draw);
    }

    draw();
</script>
</body>
</html>
単純にドカンの間をくぐるだけのゲームなので画像点数は少ないです。また各画像サイズは canvas サイズを元にバランスよく以下のように作成。 JavaScript 側で読み込みサイズを変更してもいいかもしれませんが、今回は概ね画像作成時にサイズを合わせました。

ゲームに登場してくるドカンサイズの例。
そして用意した画像パーツを canvas に表示するには、以下のように JavaScript で画像を読み込ませれば OK。

上図のコードを今確認する
<!--
canvas + button responsive
parts image 1
-->
<!DOCTYPE html>
<html lang="ja">
<head>
    <meta charset="UTF-8" />
    <title>Flappy Bird</title>
    <meta name="viewport" content="width=device-width, user-scalable=no">
    <style>
    canvas{
        background-color:#eee;
    }
    body{
        max-width:900px;
        margin:0 auto;
        text-align:center;
    }
    .button {
        display: none;
        vertical-align: middle;
        text-align:center;
        margin:32px;
    }
    .button div {
        display: inline-block;
        border-radius: 50%;
    }
    .button div:hover .up{
        border: 0.5em solid #e74c3c;
    }
    .button div:hover .up:after {
        border-top: 0.5em solid #e74c3c;
        border-right: 0.5em solid #e74c3c;
    }
    .up {
        display: inline-block;
        width: 4em;
        height: 4em;
        border: 0.5em solid #333;
        border-radius: 50%;
        margin-right: 1.5em;
    }

    .up:after {
        content: '';
        display: inline-block;
        margin-top: 1.3em;
        /*margin-left: 0.6em;*/
        width: 1.2em;
        height: 1.2em;
        border-top: 0.5em solid #333;
        border-right: 0.5em solid #333;
        -moz-transform: rotate(-45deg);
        -webkit-transform: rotate(-45deg);
        transform: rotate(-45deg);
    }

    /*canvasの上にボタンをフロート*/
    .content{
        display:inline-block;
        position:relative;
    }
    .content div {
        position:absolute;
        bottom:5px;
        right:5px;
    }
    /*canvasの上にボタンをフロート おわり*/
    @media (max-width:900px){
        .button {
            /*display: inline-block;*/
            display: inline-block;
            vertical-align: middle;
            text-align:center;
            margin:32px;
        }
    }
    </style>
</head>
<body>
<div class="content">
    <canvas id="canvas" width="500" height="300"></canvas>
    <div id="upButton" class="button">
        <div>
            <span class="up"></span>
        </div>
    </div>
</div>

<script>
    var cvs = document.getElementById("canvas");
    var ctx = cvs.getContext("2d");

    var bg = new Image(); //背景

    bg.src = "bg.png";

    function draw(){
        ctx.drawImage(bg,0,0);

        requestAnimationFrame(draw);
    }

    draw();
</script>
</body>
</html>
背景のみ canvas に読み込ませているプログラムが上図の様子で、いくつかの変数を利用して画像描写している事が分かりますね。
背景の元画像 bg.png を変数 bg に割り当てて、 drawImage()で画像を描写。この時 drawImage() の中に 0,0 とあるのは画像描写の起点を表しています。背景画像なので canvas のスミからスタートし、 requestAnimationFrame() で draw を実行。
同じ要領で他のパーツも表示させてみると以下のように。

画像の位置は、 ctx.drawImage(bird,30,100); の中の 30 と 100 で決まり、 30は横方向、 100は縦方向を意味しますね。
画像を配置すると一気にゲーム感がアップしましたので、次は画面をスクロールさせてみたいと思います。
画面スクロール
"画面スクロール"というと、背景画像を動かしているように思うかもしれませんが、実際にはドカンを右から左に動かして、あたかも画面が動いているように見せます。

上図のコードを今確認する
<!--
canvas + button responsive
parts image
scroll
-->
<!DOCTYPE html>
<html lang="ja">
<head>
    <meta charset="UTF-8" />
    <title>Flappy Bird</title>
    <meta name="viewport" content="width=device-width, user-scalable=no">
    <style>
    canvas{
        background-color:#eee;
    }
    body{
        max-width:900px;
        margin:0 auto;
        text-align:center;
    }
    .button {
        display: none;
        vertical-align: middle;
        text-align:center;
        margin:32px;
    }
    .button div {
        display: inline-block;
        border-radius: 50%;
    }
    .button div:hover .up{
        border: 0.5em solid #e74c3c;
    }
    .button div:hover .up:after {
        border-top: 0.5em solid #e74c3c;
        border-right: 0.5em solid #e74c3c;
    }
    .up {
        display: inline-block;
        width: 4em;
        height: 4em;
        border: 0.5em solid #333;
        border-radius: 50%;
        margin-right: 1.5em;
    }

    .up:after {
        content: '';
        display: inline-block;
        margin-top: 1.3em;
        /*margin-left: 0.6em;*/
        width: 1.2em;
        height: 1.2em;
        border-top: 0.5em solid #333;
        border-right: 0.5em solid #333;
        -moz-transform: rotate(-45deg);
        -webkit-transform: rotate(-45deg);
        transform: rotate(-45deg);
    }

    /*canvasの上にボタンをフロート*/
    .content{
        display:inline-block;
        position:relative;
    }
    .content div {
        position:absolute;
        bottom:5px;
        right:5px;
    }
    /*canvasの上にボタンをフロート おわり*/
    @media (max-width:900px){
        .button {
            /*display: inline-block;*/
            display: inline-block;
            vertical-align: middle;
            text-align:center;
            margin:32px;
        }
    }
    </style>
</head>
<body>
<div class="content">
    <canvas id="canvas" width="500" height="300"></canvas>
    <div id="upButton" class="button">
        <div>
            <span class="up"></span>
        </div>
    </div>
</div>

<script>
    var cvs = document.getElementById("canvas");
    var ctx = cvs.getContext("2d");

    var bg = new Image(); //背景
    var bird = new Image(); //鳥
    var fg = new Image(); //地面
    var pipeNorth = new Image(); //ドカン上
    var pipeSouth = new Image(); //ドカン下

    bg.src = "bg.png";
    bird.src = "bird.png";
    fg.src = "fg.png";
    pipeNorth.src = "pipeNorth.png";
    pipeSouth.src = "pipeSouth.png";

    var pipe = [];
    pipe[0] = {
        x : cvs.width, //canvas幅
        y : 0
    };

    function draw(){
        ctx.drawImage(bg,0,0);
        ctx.drawImage(bird,30,100);
        ctx.drawImage(fg,0,260);
        //var upDokan = ctx.drawImage(pipeNorth,300,0);
        //var bottonDokan = ctx.drawImage(pipeSouth,300,200);
        for(var i=0 ; i < pipe.length; i++){
            console.log('pipe.length:' + pipe.length);
            ctx.drawImage(pipeNorth,pipe[i].x,pipe[i].y);
            ctx.drawImage(pipeSouth,pipe[i].x,pipe[i].y+pipeNorth.height+100);
            pipe[i].x--;
            console.log('pipe[i].x: ' + pipe[i].x);
        }

        requestAnimationFrame(draw);
    }

    draw();
</script>
</body>
</html>
今回ドカンは上と下の 2つあり、上下のドカンの横位置(x)は同じ。高さは鳥がくぐれるだけ間をあけ、その状態のドカンが右から左に移動し、スクロールさせているようにみせます。
このドカンの位置関係をプログラム的に処理すると以下のように。

少しこのあたりから変数や配列(連想配列、辞書型)が登場して少し分かりにくくなりますが、分かりにくいようであればまずはコードをコピペして実際に動かし、気になる部分の値を変えて理解することが近道と思います。
まず 2本のドカンを同時に動かすためにドカンの位置情報を連想配列の pipe[i].x と pipe[i].y にセット。 1個目のパイプは pipe[0] となり、その最初のパイプ位置情報が pipe[0].x と pipe[0].y となるわけですね。そして上と下のドカンの間は 124行目の +100 の部分。この値を大きくすれば幅が広がってゲームが簡単になります。
そしてドカンの右から左に動くスピードは、 125行目の pipe[i].x--; で制御。 pipe[i] で制御することで、上と下の両方のドカンを一度に制御できていますね。 x-- とすることで x の値が 1ずつ減り、ドカンが右から左に動いていきます。この様子は、コンソールログで確認できるようにしています。
鳥の動き
さて画面がスクロールするようになりましたので、次はドカンの間をくぐれるように鳥にジャンプ機能をセットします。
まずはキーボード操作やボタン操作を有効にするための JavaScript。キーボードやボタンが JavaScript によって読み込まれているか、ログをとって確認してみました。

上図のコードを今確認する
<!--
canvas + button responsive
parts image
scroll
ボタン操作

-->
<!DOCTYPE html>
<html lang="ja">
<head>
    <meta charset="UTF-8" />
    <title>Flappy Bird</title>
    <meta name="viewport" content="width=device-width, user-scalable=no">
    <style>
    canvas{
        background-color:#eee;
    }
    body{
        max-width:900px;
        margin:0 auto;
        text-align:center;
    }
    .button {
        display: none;
        vertical-align: middle;
        text-align:center;
        margin:32px;
    }
    .button div {
        display: inline-block;
        border-radius: 50%;
    }
    .button div:hover .up{
        border: 0.5em solid #e74c3c;
    }
    .button div:hover .up:after {
        border-top: 0.5em solid #e74c3c;
        border-right: 0.5em solid #e74c3c;
    }
    .up {
        display: inline-block;
        width: 4em;
        height: 4em;
        border: 0.5em solid #333;
        border-radius: 50%;
        margin-right: 1.5em;
    }

    .up:after {
        content: '';
        display: inline-block;
        margin-top: 1.3em;
        /*margin-left: 0.6em;*/
        width: 1.2em;
        height: 1.2em;
        border-top: 0.5em solid #333;
        border-right: 0.5em solid #333;
        -moz-transform: rotate(-45deg);
        -webkit-transform: rotate(-45deg);
        transform: rotate(-45deg);
    }

    /*canvasの上にボタンをフロート*/
    .content{
        display:inline-block;
        position:relative;
    }
    .content div {
        position:absolute;
        bottom:5px;
        right:5px;
    }
    /*canvasの上にボタンをフロート おわり*/
    @media (max-width:900px){
        .button {
            /*display: inline-block;*/
            display: inline-block;
            vertical-align: middle;
            text-align:center;
            margin:32px;
        }
    }
    </style>
</head>
<body>
<div class="content">
    <canvas id="canvas" width="500" height="300"></canvas>
    <div id="upButton" class="button">
        <div>
            <span class="up"></span>
        </div>
    </div>
</div>

<script>
    var cvs = document.getElementById("canvas");
    var ctx = cvs.getContext("2d");

    var bg = new Image(); //背景
    var bird = new Image(); //鳥
    var fg = new Image(); //地面
    var pipeNorth = new Image(); //ドカン上
    var pipeSouth = new Image(); //ドカン下

    bg.src = "bg.png";
    bird.src = "bird.png";
    fg.src = "fg.png";
    pipeNorth.src = "pipeNorth.png";
    pipeSouth.src = "pipeSouth.png";

    var pipe = [];
    pipe[0] = {
        x : cvs.width, //canvas幅
        y : 0
    };

    // キーボード操作
    document.addEventListener("keydown",moveUp);
    function moveUp(e){
        console.log('キーボード:' + e.type);
    }
    // ボタン操作
    var upButton = document.getElementById("upButton");
    upButton.addEventListener("touchstart", touchButton);
    upButton.addEventListener("touchend", touchButton);
    function touchButton(e){
        console.log('ボタン:' + e.touches, e.type);
    }


    function draw(){
        ctx.drawImage(bg,0,0);
        ctx.drawImage(bird,30,100);
        ctx.drawImage(fg,0,260);
        //var upDokan = ctx.drawImage(pipeNorth,300,0);
        //var bottonDokan = ctx.drawImage(pipeSouth,300,200);
        for(var i=0 ; i < pipe.length; i++){
            //console.log('pipe.length:' + pipe.length);
            ctx.drawImage(pipeNorth,pipe[i].x,pipe[i].y);
            ctx.drawImage(pipeSouth,pipe[i].x,pipe[i].y+pipeNorth.height+100);
            pipe[i].x--;
            //console.log('pipe[i].x: ' + pipe[i].x);
        }

        requestAnimationFrame(draw);
    }
    draw();
</script>
</body>
</html>
そして鳥にジャンプ機能ですが、これは鳥の縦軸(Y) の値を変えるようにセットすれば OK。 ボタンが押されたら少し Y の値が上にいくようにセット。今は鳥の位置を ctx.drawImage(bird,30,100); でセットしていますが、この 100 の値がジャンプで変わるようになりますので、変数で管理するようにセットし直します。

そしてボタンを押す度にジャンプするように、 addEventListener() のあとの function() 内で bY -= 25 とすれば、下図のように鳥が上に動きます。

あとはジャンプばかりでは上に抜けていきますので、落下機能を追加。
ジャンプと落下のコードを今確認する
<!--
canvas + button responsive
parts image
scroll
ボタン操作
ジャンプ機能
-->
<!DOCTYPE html>
<html lang="ja">
<head>
<meta charset="UTF-8" />
<title>Flappy Bird</title>
<meta name="viewport" content="width=device-width, user-scalable=no">
<style>
canvas{
background-color:#eee;
}
body{
max-width:900px;
margin:0 auto;
text-align:center;
}
.button {
display: none;
vertical-align: middle;
text-align:center;
margin:32px;
}
.button div {
display: inline-block;
border-radius: 50%;
}
.button div:hover .up{
border: 0.5em solid #e74c3c;
}
.button div:hover .up:after {
border-top: 0.5em solid #e74c3c;
border-right: 0.5em solid #e74c3c;
}
.up {
display: inline-block;
width: 4em;
height: 4em;
border: 0.5em solid #333;
border-radius: 50%;
margin-right: 1.5em;
}
.up:after {
content: '';
display: inline-block;
margin-top: 1.3em;
/*margin-left: 0.6em;*/
width: 1.2em;
height: 1.2em;
border-top: 0.5em solid #333;
border-right: 0.5em solid #333;
-moz-transform: rotate(-45deg);
-webkit-transform: rotate(-45deg);
transform: rotate(-45deg);
}
/*canvasの上にボタンをフロート*/
.content{
display:inline-block;
position:relative;
}
.content div {
position:absolute;
bottom:5px;
right:5px;
}
/*canvasの上にボタンをフロート おわり*/
@media (max-width:900px){
.button {
/*display: inline-block;*/
display: inline-block;
vertical-align: middle;
text-align:center;
margin:32px;
}
}
</style>
</head>
<body>
<div class="content">
<canvas id="canvas" width="500" height="300"></canvas>
<div id="upButton" class="button">
<div>
<span class="up"></span>
</div>
</div>
</div>
<script>
var cvs = document.getElementById("canvas");
var ctx = cvs.getContext("2d");
var bg = new Image(); //背景
var bird = new Image(); //鳥
var fg = new Image(); //地面
var pipeNorth = new Image(); //ドカン上
var pipeSouth = new Image(); //ドカン下
bg.src = "bg.png";
bird.src = "bird.png";
fg.src = "fg.png";
pipeNorth.src = "pipeNorth.png";
pipeSouth.src = "pipeSouth.png";
var bX = 30; //鳥の表示値
var bY = 20; //鳥の表示位置
var pipe = [];
pipe[0] = {
x : cvs.width, //canvas幅
y : 0
};
// キーボード操作
document.addEventListener("keydown",moveUp);
function moveUp(e){
//console.log('キーボード:' + e.type);
bY -= 25;
console.log('bY: ' +bY);
}
// ボタン操作
var upButton = document.getElementById("upButton");
upButton.addEventListener("touchstart", touchButton);
//upButton.addEventListener("touchend", touchButton);
function touchButton(e){
//console.log('ボタン:' + e.touches, e.type);
bY -= 25;
console.log('bY: ' +bY);
}
function draw(){
ctx.drawImage(bg,0,0);
ctx.drawImage(bird,bX,bY);
ctx.drawImage(fg,0,260);
//var upDokan = ctx.drawImage(pipeNorth,300,0);
//var bottonDokan = ctx.drawImage(pipeSouth,300,200);
for(var i=0 ; i < pipe.length; i++){
//console.log('pipe.length:' + pipe.length);
ctx.drawImage(pipeNorth,pipe[i].x,pipe[i].y);
ctx.drawImage(pipeSouth,pipe[i].x,pipe[i].y+pipeNorth.height+100);
pipe[i].x--;
//console.log('pipe[i].x: ' + pipe[i].x);
}
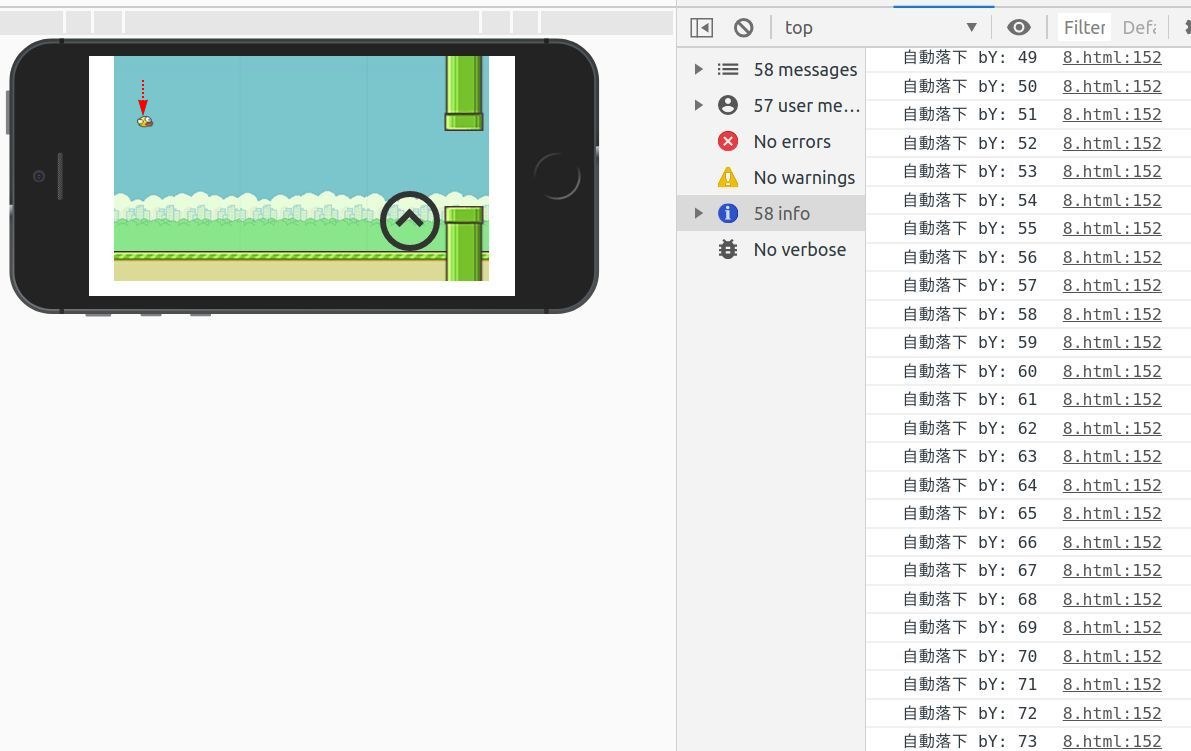
bY += 1;
console.log('自動落下 bY: ' +bY);
requestAnimationFrame(draw);
}
draw();
</script>
</body>
</html>

bY += 1; とすることで Y の値を 1ずつ自動で加算してくれます。そして鳥があたかも落下しているように見えますね。
あとはドカンに当たった時や地面に落ちた時のゲームオーバー機能とドカンをくぐった時のポイント加算機能があればゲームっぽくなるでしょう。
ゲームオーバー機能

鳥が当たったら ❌ なところを赤線
上図のコードを今確認する
<!--
canvas + button responsive
parts image
scroll
ボタン操作
ジャンプ機能
ゲームオーバー
-->
<!DOCTYPE html>
<html lang="ja">
<head>
    <meta charset="UTF-8" />
    <title>Flappy Bird</title>
    <meta name="viewport" content="width=device-width, user-scalable=no">
    <style>
    canvas{
        background-color:#eee;
    }
    body{
        max-width:900px;
        margin:0 auto;
        text-align:center;
    }
    .button {
        display: none;
        vertical-align: middle;
        text-align:center;
        margin:32px;
    }
    .button div {
        display: inline-block;
        border-radius: 50%;
    }
    .button div:hover .up{
        border: 0.5em solid #e74c3c;
    }
    .button div:hover .up:after {
        border-top: 0.5em solid #e74c3c;
        border-right: 0.5em solid #e74c3c;
    }
    .up {
        display: inline-block;
        width: 4em;
        height: 4em;
        border: 0.5em solid #333;
        border-radius: 50%;
        margin-right: 1.5em;
    }

    .up:after {
        content: '';
        display: inline-block;
        margin-top: 1.3em;
        /*margin-left: 0.6em;*/
        width: 1.2em;
        height: 1.2em;
        border-top: 0.5em solid #333;
        border-right: 0.5em solid #333;
        -moz-transform: rotate(-45deg);
        -webkit-transform: rotate(-45deg);
        transform: rotate(-45deg);
    }

    /*canvasの上にボタンをフロート*/
    .content{
        display:inline-block;
        position:relative;
    }
    .content div {
        position:absolute;
        bottom:5px;
        right:5px;
    }
    /*canvasの上にボタンをフロート おわり*/
    @media (max-width:900px){
        .button {
            /*display: inline-block;*/
            display: inline-block;
            vertical-align: middle;
            text-align:center;
            margin:32px;
        }
    }
    </style>
</head>
<body>
<div class="content">
    <canvas id="canvas" width="500" height="300"></canvas>
    <div id="upButton" class="button">
        <div>
            <span class="up"></span>
        </div>
    </div>
</div>

<script>
    var cvs = document.getElementById("canvas");
    var ctx = cvs.getContext("2d");

    var bg = new Image(); //背景
    var bird = new Image(); //鳥
    var fg = new Image(); //地面
    var pipeNorth = new Image(); //ドカン上
    var pipeSouth = new Image(); //ドカン下

    bg.src = "bg.png";
    bird.src = "bird.png";
    fg.src = "fg.png";
    pipeNorth.src = "pipeNorth.png";
    pipeSouth.src = "pipeSouth.png";

    var bX = 30;  //鳥の表示値
    var bY = 20;  //鳥の表示位置
   var gap = 100;  //ドカンの縦幅
   var constant;

    var pipe = [];
    pipe[0] = {
        x : cvs.width, //canvas幅
        y : 0
    };

    // キーボード操作
    document.addEventListener("keydown",moveUp);
    function moveUp(e){
        //console.log('キーボード:' + e.type);
        bY -= 25;
        //console.log('bY: ' +bY);
    }
    // ボタン操作
    var upButton = document.getElementById("upButton");
    upButton.addEventListener("touchstart", touchButton);
    //upButton.addEventListener("touchend", touchButton);
    function touchButton(e){
        //console.log('ボタン:' + e.touches, e.type);
        bY -= 25;
        //console.log('bY: ' +bY);
    }


    function draw(){
        ctx.drawImage(bg,0,0);
        ctx.drawImage(bird,bX,bY);
        ctx.drawImage(fg,0,cvs.height - fg.height);
        //var upDokan = ctx.drawImage(pipeNorth,300,0);
        //var bottonDokan = ctx.drawImage(pipeSouth,300,200);
        for(var i=0 ; i < pipe.length; i++){
            //console.log('pipe.length:' + pipe.length);
            constant = pipeNorth.height+gap;
            ctx.drawImage(pipeNorth,pipe[i].x,pipe[i].y);
            ctx.drawImage(pipeSouth,pipe[i].x,pipe[i].y+constant);
            pipe[i].x--;

            //ゲームオーバーのパターン
            if( bX + bird.width >= pipe[i].x && bX <= pipe[i].x + pipeNorth.width && (bY <= pipe[i].y + pipeNorth.height || bY+bird.height >= pipe[i].y+constant) || bY + bird.height >=  cvs.height - fg.height){

            console.log('鳥の右横位置 bX + bird.width: ' + (bX + bird.width));
            console.log('パイプの左横位置 pipe[i].x: ' + (pipe[i].x));
            console.log('鳥の左横位置 bX: ' + bX );
            console.log('パイプの右横位置 pipe[i].x + pipeNorth.width: ' + (pipe[i].x + pipeNorth.width));
            console.log('鳥の頭側 bY: ' + bY);
            console.log('上のパイプの高さ pipe[i].y + pipeNorth.height: ' + (pipe[i].y + pipeNorth.height));
            console.log('鳥の足側 bY+bird.height: ' + (bY+bird.height));
            console.log('下のパイプの高さ pipe[i].y+content: ' + (pipe[i].y+constant));
            console.log('地面の高さ cvs.height - fg.height: ' + (cvs.height - fg.height));

            alert("うわっ、当たっちゃった");
            }
        }
        bY += 1;
        //console.log('自動落下 bY: ' +bY);
        requestAnimationFrame(draw);
    }

    draw();
</script>
</body>
</html>
Flappy Bird においては、ドカンに当たるか地面に落下したら ❌ ですね。この ❌ 判定、プログラムに理解してもらおうと思うと少し複雑で、以下のような if文で表現できます。

156行目の if文に ❌ な時のパターンを定義しているのですが、チョットイメージしにくいですよね。各値をログ出力するようにしていますので、実際にドカンに当てて、 ❌ な場合を確認してみましょう。

こちらは上のドカンに正面からぶつかったケース。上のパイプよりも鳥は上に位置して、鳥の右側とパイプの左側が一緒なため ❌ 判定に。

こちらは少し分かりにくいですが、ドカンをくぐるときに、上のドカンに当たったケース。鳥の左側がドカンの右側を通過していなく、直克ドカン上の長さと鳥の頭の位置が一致したため ❌ となっています。

最後に地面に落下したパターン。鳥の足の位置と地面の高さが一致しているため ❌ 判定。
今回は ❌ なときにアラート表示していますが、 3回まであたっても OK などゲームオーバーのポイントを変えるとよりゲームぽくなりますね。
ポイント加算

上図のコードを今確認する
<!--
canvas + button responsive
parts image
scroll
ボタン操作
ジャンプ機能
ゲームオーバー
点数
-->
<!DOCTYPE html>
<html lang="ja">
<head>
    <meta charset="UTF-8" />
    <title>Flappy Bird</title>
    <meta name="viewport" content="width=device-width, user-scalable=no">
    <style>
    canvas{
        background-color:#eee;
    }
    body{
        max-width:900px;
        margin:0 auto;
        text-align:center;
    }
    .button {
        display: none;
        vertical-align: middle;
        text-align:center;
        margin:32px;
    }
    .button div {
        display: inline-block;
        border-radius: 50%;
    }
    .button div:hover .up{
        border: 0.5em solid #e74c3c;
    }
    .button div:hover .up:after {
        border-top: 0.5em solid #e74c3c;
        border-right: 0.5em solid #e74c3c;
    }
    .up {
        display: inline-block;
        width: 4em;
        height: 4em;
        border: 0.5em solid #333;
        border-radius: 50%;
        margin-right: 1.5em;
    }

    .up:after {
        content: '';
        display: inline-block;
        margin-top: 1.3em;
        /*margin-left: 0.6em;*/
        width: 1.2em;
        height: 1.2em;
        border-top: 0.5em solid #333;
        border-right: 0.5em solid #333;
        -moz-transform: rotate(-45deg);
        -webkit-transform: rotate(-45deg);
        transform: rotate(-45deg);
    }

    /*canvasの上にボタンをフロート*/
    .content{
        display:inline-block;
        position:relative;
    }
    .content div {
        position:absolute;
        bottom:5px;
        right:5px;
    }
    /*canvasの上にボタンをフロート おわり*/
    @media (max-width:900px){
        .button {
            /*display: inline-block;*/
            display: inline-block;
            vertical-align: middle;
            text-align:center;
            margin:32px;
        }
    }
    </style>
</head>
<body>
<div class="content">
    <canvas id="canvas" width="500" height="300"></canvas>
    <div id="upButton" class="button">
        <div>
            <span class="up"></span>
        </div>
    </div>
</div>

<script>
    var cvs = document.getElementById("canvas");
    var ctx = cvs.getContext("2d");

    var bg = new Image(); //背景
    var bird = new Image(); //鳥
    var fg = new Image(); //地面
    var pipeNorth = new Image(); //ドカン上
    var pipeSouth = new Image(); //ドカン下

    bg.src = "bg.png";
    bird.src = "bird.png";
    fg.src = "fg.png";
    pipeNorth.src = "pipeNorth.png";
    pipeSouth.src = "pipeSouth.png";

    var bX = 30;  //鳥の表示値
    var bY = 20;  //鳥の表示位置
   var gap = 100;  //ドカンの縦幅
   var constant;

    var pipe = [];
    pipe[0] = {
        x : cvs.width, //canvas幅
        y : 0
    };

    // キーボード操作
    document.addEventListener("keydown",moveUp);
    function moveUp(e){
        //console.log('キーボード:' + e.type);
        bY -= 25;
        //console.log('bY: ' +bY);
    }
    // ボタン操作
    var upButton = document.getElementById("upButton");
    upButton.addEventListener("touchstart", touchButton);
    //upButton.addEventListener("touchend", touchButton);
    function touchButton(e){
        //console.log('ボタン:' + e.touches, e.type);
        bY -= 25;
        //console.log('bY: ' +bY);
    }


    function draw(){
        ctx.drawImage(bg,0,0);
        ctx.drawImage(bird,bX,bY);
        ctx.drawImage(fg,0,cvs.height - fg.height);
        //var upDokan = ctx.drawImage(pipeNorth,300,0);
        //var bottonDokan = ctx.drawImage(pipeSouth,300,200);
        for(var i=0 ; i < pipe.length; i++){
            //console.log('pipe.length:' + pipe.length);
            constant = pipeNorth.height+gap;
            ctx.drawImage(pipeNorth,pipe[i].x,pipe[i].y);
            ctx.drawImage(pipeSouth,pipe[i].x,pipe[i].y+constant);
            pipe[i].x--;

            //ゲームオーバーのパターン
            if( bX + bird.width >= pipe[i].x && bX <= pipe[i].x + pipeNorth.width && (bY <= pipe[i].y + pipeNorth.height || bY+bird.height >= pipe[i].y+constant) || bY + bird.height >=  cvs.height - fg.height){

            //console.log('鳥の右横位置 bX + bird.width: ' + (bX + bird.width));
            //console.log('パイプの左横位置 pipe[i].x: ' + (pipe[i].x));
            //console.log('鳥の左横位置 bX: ' + bX );
            //console.log('パイプの右横位置 pipe[i].x + pipeNorth.width: ' + (pipe[i].x + pipeNorth.width));
            //console.log('鳥の頭側 bY: ' + bY);
            //console.log('上のパイプの高さ pipe[i].y + pipeNorth.height: ' + (pipe[i].y + pipeNorth.height));
            //console.log('鳥の足側 bY+bird.height: ' + (bY+bird.height));
            //console.log('下のパイプの高さ pipe[i].y+content: ' + (pipe[i].y+constant));
            //console.log('地面の高さ cvs.height - fg.height: ' + (cvs.height - fg.height));

            alert("うわっ、当たっちゃった");
            }
        }
        bY += 1;

        ctx.fillStyle = "#000"; //カラー
        ctx.font = "16px"; //大きさ
        ctx.fillText("点数 : " + 100000 + ' point',10,cvs.height-20); //表示内容、位置
        requestAnimationFrame(draw);
    }

    draw();
</script>
</body>
</html>
まずは既存の画面に、ポイントの文字を表示。 JavaScript で canvas に文字を書きたい時は、下図のようにスタイルと内容、位置を指定してあげれば OK。

そして今は 100000ポイントですが、これをドカンを通る度に 1ポイント加算するようにプログラムを変更。

加算機能付きプログラムを今確認する
<!--
canvas + button responsive
parts image
scroll
ボタン操作
ジャンプ機能
ゲームオーバー
点数 , 加算機能
-->
<!DOCTYPE html>
<html lang="ja">
<head>
    <meta charset="UTF-8" />
    <title>Flappy Bird</title>
    <meta name="viewport" content="width=device-width, user-scalable=no">
    <style>
    canvas{
        background-color:#eee;
    }
    body{
        max-width:900px;
        margin:0 auto;
        text-align:center;
    }
    .button {
        display: none;
        vertical-align: middle;
        text-align:center;
        margin:32px;
    }
    .button div {
        display: inline-block;
        border-radius: 50%;
    }
    .button div:hover .up{
        border: 0.5em solid #e74c3c;
    }
    .button div:hover .up:after {
        border-top: 0.5em solid #e74c3c;
        border-right: 0.5em solid #e74c3c;
    }
    .up {
        display: inline-block;
        width: 4em;
        height: 4em;
        border: 0.5em solid #333;
        border-radius: 50%;
        margin-right: 1.5em;
    }

    .up:after {
        content: '';
        display: inline-block;
        margin-top: 1.3em;
        /*margin-left: 0.6em;*/
        width: 1.2em;
        height: 1.2em;
        border-top: 0.5em solid #333;
        border-right: 0.5em solid #333;
        -moz-transform: rotate(-45deg);
        -webkit-transform: rotate(-45deg);
        transform: rotate(-45deg);
    }

    /*canvasの上にボタンをフロート*/
    .content{
        display:inline-block;
        position:relative;
    }
    .content div {
        position:absolute;
        bottom:5px;
        right:5px;
    }
    /*canvasの上にボタンをフロート おわり*/
    @media (max-width:900px){
        .button {
            /*display: inline-block;*/
            display: inline-block;
            vertical-align: middle;
            text-align:center;
            margin:32px;
        }
    }
    </style>
</head>
<body>
<div class="content">
    <canvas id="canvas" width="500" height="300"></canvas>
    <div id="upButton" class="button">
        <div>
            <span class="up"></span>
        </div>
    </div>
</div>

<script>
    var cvs = document.getElementById("canvas");
    var ctx = cvs.getContext("2d");

    var bg = new Image(); //背景
    var bird = new Image(); //鳥
    var fg = new Image(); //地面
    var pipeNorth = new Image(); //ドカン上
    var pipeSouth = new Image(); //ドカン下

    bg.src = "bg.png";
    bird.src = "bird.png";
    fg.src = "fg.png";
    pipeNorth.src = "pipeNorth.png";
    pipeSouth.src = "pipeSouth.png";

    var bX = 30;  //鳥の表示値
    var bY = 20;  //鳥の表示位置
   var gap = 100;  //ドカンの縦幅
   var constant;
   var score = 0;

    var pipe = [];
    pipe[0] = {
        x : cvs.width, //canvas幅
        y : 0
    };

    // キーボード操作
    document.addEventListener("keydown",moveUp);
    function moveUp(e){
        //console.log('キーボード:' + e.type);
        bY -= 25;
        //console.log('bY: ' +bY);
    }
    // ボタン操作
    var upButton = document.getElementById("upButton");
    upButton.addEventListener("touchstart", touchButton);
    //upButton.addEventListener("touchend", touchButton);
    function touchButton(e){
        //console.log('ボタン:' + e.touches, e.type);
        bY -= 25;
        //console.log('bY: ' +bY);
    }


    function draw(){
        ctx.drawImage(bg,0,0);
        ctx.drawImage(bird,bX,bY);
        ctx.drawImage(fg,0,cvs.height - fg.height);
        //var upDokan = ctx.drawImage(pipeNorth,300,0);
        //var bottonDokan = ctx.drawImage(pipeSouth,300,200);
        for(var i=0 ; i < pipe.length; i++){
            //console.log('pipe.length:' + pipe.length);
            constant = pipeNorth.height+gap;
            ctx.drawImage(pipeNorth,pipe[i].x,pipe[i].y);
            ctx.drawImage(pipeSouth,pipe[i].x,pipe[i].y+constant);
            pipe[i].x--;

            //ゲームオーバーのパターン
            if( bX + bird.width >= pipe[i].x && bX <= pipe[i].x + pipeNorth.width && (bY <= pipe[i].y + pipeNorth.height || bY+bird.height >= pipe[i].y+constant) || bY + bird.height >=  cvs.height - fg.height){

            //console.log('鳥の右横位置 bX + bird.width: ' + (bX + bird.width));
            //console.log('パイプの左横位置 pipe[i].x: ' + (pipe[i].x));
            //console.log('鳥の左横位置 bX: ' + bX );
            //console.log('パイプの右横位置 pipe[i].x + pipeNorth.width: ' + (pipe[i].x + pipeNorth.width));
            //console.log('鳥の頭側 bY: ' + bY);
            //console.log('上のパイプの高さ pipe[i].y + pipeNorth.height: ' + (pipe[i].y + pipeNorth.height));
            //console.log('鳥の足側 bY+bird.height: ' + (bY+bird.height));
            //console.log('下のパイプの高さ pipe[i].y+content: ' + (pipe[i].y+constant));
            //console.log('地面の高さ cvs.height - fg.height: ' + (cvs.height - fg.height));

            alert("うわっ、当たっちゃった");
            }
            if(pipe[i].x == bX){
                score++;
            }
        }
        bY += 1;

        ctx.fillStyle = "#000"; //カラー
        ctx.font = "16px"; //大きさ
        ctx.fillText("点数 : " + score + ' point',10,cvs.height-20); //表示内容、位置
        requestAnimationFrame(draw);
    }

    draw();
</script>
</body>
</html>
新しく 変数: score を定義して、 ゲームオーバープログラムに引っかからなく、ドカンを通り過ぎたと認識したら + 1 ポイント加算、とプログラムしています。
これで横スクロールに必用な、 「画面のスクロール」、「障害物」、「得点」、「ゲームオーバー」が実装できました。只、今の段階ではドカンが一回しか登場してきません。もっとたくさんドカンが出てきて、くぐり抜ける方が面白そうですよね。
障害物のドカンをたくさん出す方法

上図のコードを今確認する
<!--
canvas + button responsive
parts image
scroll
ボタン操作
ジャンプ機能
ゲームオーバー
点数 , 加算機能
ドカンたくさん
-->
<!DOCTYPE html>
<html lang="ja">
<head>
    <meta charset="UTF-8" />
    <title>Flappy Bird</title>
    <meta name="viewport" content="width=device-width, user-scalable=no">
    <style>
    canvas{
        background-color:#eee;
    }
    body{
        max-width:900px;
        margin:0 auto;
        text-align:center;
    }
    .button {
        display: none;
        vertical-align: middle;
        text-align:center;
        margin:32px;
    }
    .button div {
        display: inline-block;
        border-radius: 50%;
    }
    .button div:hover .up{
        border: 0.5em solid #e74c3c;
    }
    .button div:hover .up:after {
        border-top: 0.5em solid #e74c3c;
        border-right: 0.5em solid #e74c3c;
    }
    .up {
        display: inline-block;
        width: 4em;
        height: 4em;
        border: 0.5em solid #333;
        border-radius: 50%;
        margin-right: 1.5em;
    }

    .up:after {
        content: '';
        display: inline-block;
        margin-top: 1.3em;
        /*margin-left: 0.6em;*/
        width: 1.2em;
        height: 1.2em;
        border-top: 0.5em solid #333;
        border-right: 0.5em solid #333;
        -moz-transform: rotate(-45deg);
        -webkit-transform: rotate(-45deg);
        transform: rotate(-45deg);
    }

    /*canvasの上にボタンをフロート*/
    .content{
        display:inline-block;
        position:relative;
    }
    .content div {
        position:absolute;
        bottom:5px;
        right:5px;
    }
    /*canvasの上にボタンをフロート おわり*/
    @media (max-width:900px){
        .button {
            /*display: inline-block;*/
            display: inline-block;
            vertical-align: middle;
            text-align:center;
            margin:32px;
        }
    }
    </style>
</head>
<body>
<div class="content">
    <canvas id="canvas" width="500" height="300"></canvas>
    <div id="upButton" class="button">
        <div>
            <span class="up"></span>
        </div>
    </div>
</div>

<script>
    var cvs = document.getElementById("canvas");
    var ctx = cvs.getContext("2d");

    var bg = new Image(); //背景
    var bird = new Image(); //鳥
    var fg = new Image(); //地面
    var pipeNorth = new Image(); //ドカン上
    var pipeSouth = new Image(); //ドカン下

    bg.src = "bg.png";
    bird.src = "bird.png";
    fg.src = "fg.png";
    pipeNorth.src = "pipeNorth.png";
    pipeSouth.src = "pipeSouth.png";

    var bX = 30;  //鳥の表示値
    var bY = 20;  //鳥の表示位置
   var gap = 100;  //ドカンの縦幅
   var constant;
   var score = 0;

    var pipe = [];
    pipe[0] = {
        x : cvs.width, //canvas幅
        y : 0
    };

    // キーボード操作
    document.addEventListener("keydown",moveUp);
    function moveUp(e){
        //console.log('キーボード:' + e.type);
        bY -= 25;
        //console.log('bY: ' +bY);
    }
    // ボタン操作
    var upButton = document.getElementById("upButton");
    upButton.addEventListener("touchstart", touchButton);
    //upButton.addEventListener("touchend", touchButton);
    function touchButton(e){
        //console.log('ボタン:' + e.touches, e.type);
        bY -= 25;
        //console.log('bY: ' +bY);
    }


    function draw(){
        ctx.drawImage(bg,0,0);
        ctx.drawImage(bird,bX,bY);
        ctx.drawImage(fg,0,cvs.height - fg.height);
        //var upDokan = ctx.drawImage(pipeNorth,300,0);
        //var bottonDokan = ctx.drawImage(pipeSouth,300,200);
        for(var i=0 ; i < pipe.length; i++){
            //console.log('pipe.length:' + pipe.length);
            constant = pipeNorth.height+gap;
            ctx.drawImage(pipeNorth,pipe[i].x,pipe[i].y);
            ctx.drawImage(pipeSouth,pipe[i].x,pipe[i].y+constant);
            pipe[i].x--;

            if( pipe[i].x == 300 ){  //ドカン左端位置が200進んだら(200 = canvas幅:500 - ドカン左端pipe[i].x 300)
                pipe.push({
                    x : cvs.width,
                    y : Math.floor(Math.random()*pipeNorth.height)-pipeNorth.height
                });
            }
            console.log('ドカン何個目? ' + i);
            console.log('ドカン左側の位置' + pipe[i].x);
            console.log('ランダム値:' + (Math.random()));
            console.log('ドカン上側の長さ:' + pipeNorth.height);
            console.log('ランダム値 整形後:' + (Math.floor(Math.random()*pipeNorth.height)));
            console.log('計算結果の y 値:' + (Math.floor(Math.random()*pipeNorth.height)-pipeNorth.height));
            console.log('-------');

            //ゲームオーバーのパターン
            if( bX + bird.width >= pipe[i].x && bX <= pipe[i].x + pipeNorth.width && (bY <= pipe[i].y + pipeNorth.height || bY+bird.height >= pipe[i].y+constant) || bY + bird.height >=  cvs.height - fg.height){

            //console.log('鳥の右横位置 bX + bird.width: ' + (bX + bird.width));
            //console.log('パイプの左横位置 pipe[i].x: ' + (pipe[i].x));
            //console.log('鳥の左横位置 bX: ' + bX );
            //console.log('パイプの右横位置 pipe[i].x + pipeNorth.width: ' + (pipe[i].x + pipeNorth.width));
            //console.log('鳥の頭側 bY: ' + bY);
            //console.log('上のパイプの高さ pipe[i].y + pipeNorth.height: ' + (pipe[i].y + pipeNorth.height));
            //console.log('鳥の足側 bY+bird.height: ' + (bY+bird.height));
            //console.log('下のパイプの高さ pipe[i].y+content: ' + (pipe[i].y+constant));
            //console.log('地面の高さ cvs.height - fg.height: ' + (cvs.height - fg.height));

            alert("うわっ、当たっちゃった");
            }
            if(pipe[i].x == bX){
                score++;
            }
        }
        bY += 1;

        ctx.fillStyle = "#000"; //カラー
        ctx.font = "16px"; //大きさ
        ctx.fillText("点数 : " + score + ' point',10,cvs.height-20); //表示内容、位置
        requestAnimationFrame(draw);
    }

    draw();
</script>
</body>
</html>
ドカンを無数に出力する方法としては、スクロール機能実装時に登場した 配列:pipe[] を新しく足せば OK。つまり配列にデータを追加するので JavaScript の関数: push() を使用、コードに書くと以下のように。

上図では1つ目のパイプが 200px 進んだら、新しくドカンを追加するようにセット。 157行目の if( pipe[i].x == 300 の部分で次のドカンを登場させるようにセットしていて、これは canvas の横幅と pipe[i].x の値によって 200 を変えることはできます。 300より数字を小さくすれば、ゆっくりめに次のドカンは登場しますし、 300より値を大きくすれば頻繁に新しいドカンが登場するようになります、
さあ、これで一通りゲームとして機能が装備されましたね。あとは 1面、 2面 とステージを作っていくも良し、ドカンに加えて敵キャラを登場させるも良し、ゲーム・ミュージックやリアクション音を加えるも良しですね。
本稿の完成形プログラム
<!--
canvas + button responsive
parts image
scroll
ボタン操作
ジャンプ機能
ゲームオーバー
点数 , 加算機能
ドカンたくさん
リトライ機能
-->
<!DOCTYPE html>
<html lang="ja">
<head>
    <meta charset="UTF-8" />
    <title>Flappy Bird</title>
    <meta name="viewport" content="width=device-width, user-scalable=no">
    <style>
    canvas{
        background-color:#eee;
    }
    body{
        max-width:900px;
        margin:0 auto;
        text-align:center;
    }
    .button {
        display: none;
        vertical-align: middle;
        text-align:center;
        margin:32px;
    }
    .button div {
        display: inline-block;
        border-radius: 50%;
    }
    .button div:hover .up{
        border: 0.5em solid #e74c3c;
    }
    .button div:hover .up:after {
        border-top: 0.5em solid #e74c3c;
        border-right: 0.5em solid #e74c3c;
    }
    .up {
        display: inline-block;
        width: 4em;
        height: 4em;
        border: 0.5em solid #333;
        border-radius: 50%;
        margin-right: 1.5em;
    }

    .up:after {
        content: '';
        display: inline-block;
        margin-top: 1.3em;
        /*margin-left: 0.6em;*/
        width: 1.2em;
        height: 1.2em;
        border-top: 0.5em solid #333;
        border-right: 0.5em solid #333;
        -moz-transform: rotate(-45deg);
        -webkit-transform: rotate(-45deg);
        transform: rotate(-45deg);
    }

    /*canvasの上にボタンをフロート*/
    .content{
        display:inline-block;
        position:relative;
    }
    .content div {
        position:absolute;
        bottom:5px;
        right:5px;
    }
    /*canvasの上にボタンをフロート おわり*/
    @media (max-width:900px){
        .button {
            /*display: inline-block;*/
            display: inline-block;
            vertical-align: middle;
            text-align:center;
            margin:32px;
        }
    }
    </style>
</head>
<body>
<div class="content">
    <canvas id="canvas" width="500" height="300"></canvas>
    <div id="upButton" class="button">
        <div>
            <span class="up"></span>
        </div>
    </div>
</div>

<script>
    var cvs = document.getElementById("canvas");
    var ctx = cvs.getContext("2d");

    var bg = new Image(); //背景
    var bird = new Image(); //鳥
    var fg = new Image(); //地面
    var pipeNorth = new Image(); //ドカン上
    var pipeSouth = new Image(); //ドカン下

    bg.src = "bg.png";
    bird.src = "bird.png";
    fg.src = "fg.png";
    pipeNorth.src = "pipeNorth.png";
    pipeSouth.src = "pipeSouth.png";

    var bX = 30;  //鳥の表示値
    var bY = 20;  //鳥の表示位置
   var gap = 100;  //ドカンの縦幅
   var constant;
   var score = 0;

    var pipe = [];
    pipe[0] = {
        x : cvs.width, //canvas幅
        y : 0
    };

    // キーボード操作
    document.addEventListener("keydown",moveUp);
    function moveUp(e){
        //console.log('キーボード:' + e.type);
        bY -= 25;
        //console.log('bY: ' +bY);
    }
    // ボタン操作
    var upButton = document.getElementById("upButton");
    upButton.addEventListener("touchstart", touchButton);
    //upButton.addEventListener("touchend", touchButton);
    function touchButton(e){
        //console.log('ボタン:' + e.touches, e.type);
        bY -= 25;
        //console.log('bY: ' +bY);
    }

    function reload() {
        location.reload();
    }

    function draw(){
        ctx.drawImage(bg,0,0);
        ctx.drawImage(bird,bX,bY);
        ctx.drawImage(fg,0,cvs.height - fg.height);
        //var upDokan = ctx.drawImage(pipeNorth,300,0);
        //var bottonDokan = ctx.drawImage(pipeSouth,300,200);
        for(var i=0 ; i < pipe.length; i++){
            //console.log('pipe.length:' + pipe.length);
            constant = pipeNorth.height+gap;
            ctx.drawImage(pipeNorth,pipe[i].x,pipe[i].y);
            ctx.drawImage(pipeSouth,pipe[i].x,pipe[i].y+constant);
            pipe[i].x--;

            if( pipe[i].x == 300 ){  //ドカン左端位置が200進んだら(200 = canvas幅:500 - ドカン左端pipe[i].x 300)
                pipe.push({
                    x : cvs.width,
                    y : Math.floor(Math.random()*pipeNorth.height)-pipeNorth.height
                });
            }
            console.log('ドカン何個目? ' + i);
            console.log('ドカン左側の位置' + pipe[i].x);
            console.log('ランダム値:' + (Math.random()));
            console.log('ドカン上側の長さ:' + pipeNorth.height);
            console.log('ランダム値 整形後:' + (Math.floor(Math.random()*pipeNorth.height)));
            console.log('計算結果の y 値:' + (Math.floor(Math.random()*pipeNorth.height)-pipeNorth.height));
            console.log('-------');

            //ゲームオーバーのパターン
            if( bX + bird.width >= pipe[i].x && bX <= pipe[i].x + pipeNorth.width && (bY <= pipe[i].y + pipeNorth.height || bY+bird.height >= pipe[i].y+constant) || bY + bird.height >=  cvs.height - fg.height){

            //alert("うわっ、当たっちゃった");
            //return false;
            ctx.fillStyle = "red"; //カラー
            ctx.fillText("ゲームオーバー  3秒後リスタート", cvs.width/2, cvs.height/2); //表示内容、位置
            setTimeout(reload, 3000);
            }
            if(pipe[i].x == bX){
                score++;
            }
        }
        bY += 1;

        ctx.fillStyle = "#000"; //カラー
        ctx.font = "16px"; //大きさ
        ctx.fillText("点数 : " + score + ' point',10,cvs.height-20); //表示内容、位置
        requestAnimationFrame(draw);
    }

    draw();
</script>
</body>
</html>
Play(不完全、フリーズします)
今回のプログラム、ローカル環境では問題なく動きますが、サーバーにセットすると reload() 部分で問題が。ブラウザがフリーズしてしまいます。
しかし今の状態では、スマホが縦向きの場合、ジャンプボタンが登場しなく下図のようにゲームをプレイすることはできません。

出来上がった Flappy Game も端末環境によってはジャンプ・ボタンが表示されなく ❌
この問題は JavaScript で端末の種類を判定し、スマホの向きを JavaScript で検知し、縦向きであれば 「横にしてね」 とアナウンスするようにすれば大丈夫。文量的なこともありますので、このあたりの振り分け処理は、別途記事にまとめます。
\Webサイト担当者としてのスキルが身に付く/
まとめ
今回ご紹介した横スクロール型のゲーム: Flappy Bird、 実装した機能は以下の 5点。
- 画面スクロール
- ジャンプ機能
- 得点
- ゲームアウト
- 障害物のランダム表示
最初は複雑に感じる JavaScript も、自分なりにアレンジしようとコードを変えていく内に段々慣れてくると思います。そして次第に JavaScript に対する "負" のイメージがなくなる....のではないでしょうか?
プログラミングを学習するモチベーションは人それぞれと思いますが、 "ゲーム" は老若男女楽しめますし、自分で作ったゲームをレンタルサーバー等にアップして、そしてホームページなんかで紹介できたら Good ですよね。
「うわっ、 JavaScript 以前にどうやったらブラウザでプログラムを実行できるか分からない」 「基礎から学びたい」 と思われている方、独学もいいですがプロが教えるコードキャンプもいいと思いますよ。
「お金」 「時間」 「環境」 の問題もあると思いますので、まずはお気軽に "お試しレッスン" 受講してみませんか? 空きがあれば即日対応も可能です。


- この記事を書いた人
- オシママサラ


