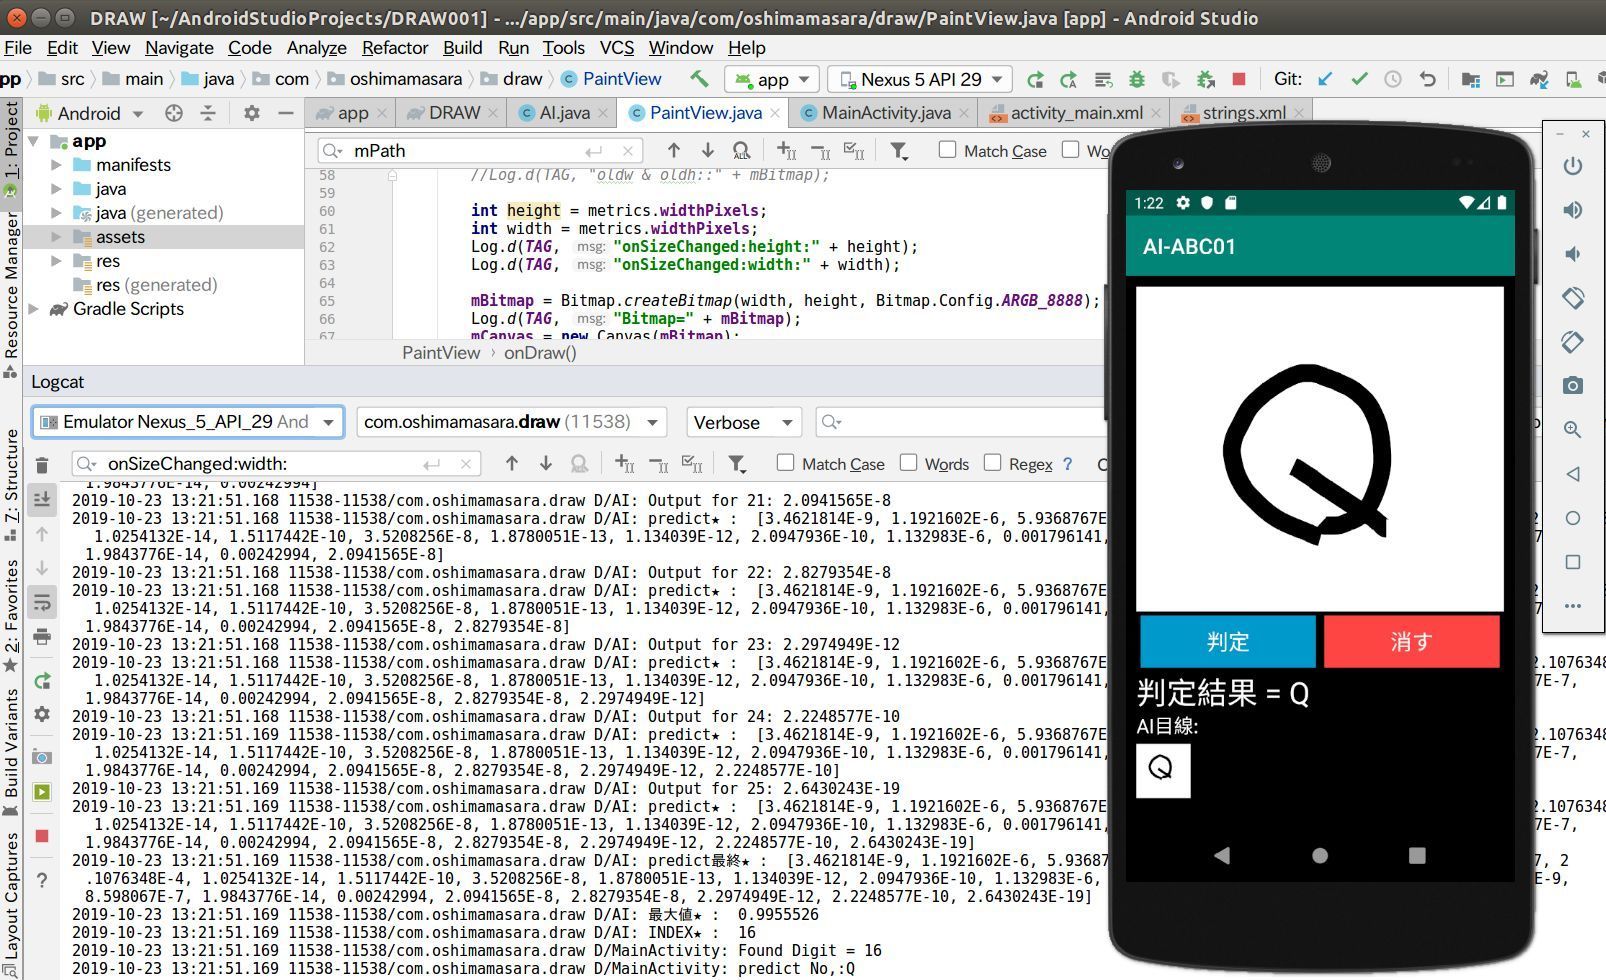
”AIアプリ”っていうと少し難しそうな印象を受けるかもしれませんが、 Android の基礎が分かっていれば大丈夫。
今回は、スマホ上で文字を書いて、 AI に判定してもらう、というアプリの作り方をご紹介していきます。
【今回ご紹介する内容】
・ AIに文字を判定してもらうアプリ
・ 大文字のローマ字と数字の 2種類を判定してもらう
・ 対象スマホ/ Android

【対象者】
・ Androidアプリ開発に興味ある方
・ AIアプリに興味ある方
・ 人工知能に興味ある方

【開発環境】
・ Android Studio
・ パソコン(Windowsでも Macでも Linuxでも OK)
・ 実機不要

【目的】
・ AI アプリの仕組みを理解
・ アプリ開発に興味をモッテもらい、チャレンジしてもらうため

⚠ 高性能な AI を開発する目的の記事ではありません。 AI や 人工知能に親しんでもらう、自分でもできそう、と思ってもらい、希望が湧くことを目的としています。
【はじめてのAndroidアプリ開発】文字を判定できるAIアプリを作ってみよう AIアプリの開発フロー
今回は手書き文字を AI に判定してもらう、ということで手書きできるキャンバス機能を用意する必要があります。そしてスマホ上で手書きできるようになったら、手書き文字を学習済みの”model”に投入し、予測値を Get、という流れが一般的。尚、学習済みの”モデル”については、今回は GitHub などで公開されているプログラムを利用し、事前に用意しておくとします。
【今回使用するモデル】
MNIST は、手書きの数字をデータセットにし、機械学習させたモデル。学習に用いた画像サイズは 28×28ピクセル。 もうひとつの ABC も手書きのローマ字(大文字)をデータセットに使用し、機械学習させたモデル。こちらは 128×128ピクセルと先ほどの MNIST より大きめ。
今回はあえて 2種類の”サイズ”を学習したモデルを使用し、 AI アプリの”コツ”を確認していければと思います。
ペイントAIアプリを作る様子の動画
VIDEO
本稿でご紹介する作業風景をご確認頂けると思います。
ペイントアプリの作成
Code: GitHub/oshimamasara/DRAW(ペイントのみ)
コードを今見る(activity_main.xml))
<?xml version="1.0" encoding="utf-8"?>
<RelativeLayout
    xmlns:android="http://schemas.android.com/apk/res/android"
    xmlns:app="http://schemas.android.com/apk/res-auto"
    xmlns:tools="http://schemas.android.com/tools"
    android:layout_width="match_parent"
    android:layout_height="match_parent"
    tools:context=".MainActivity"

    android:id="@+id/activity_main"
    android:paddingBottom="0dp"
    android:paddingLeft="0dp"
    android:paddingRight="0dp"
    android:paddingTop="0dp"
    android:background="@android:color/white"
    >

    <com.oshimamasara.draw.PaintView
        android:id="@+id/canvas"
        android:layout_width="match_parent"
        android:layout_height="match_parent"
        android:layout_alignParentTop="true"
        android:layout_centerHorizontal="true"
        android:layout_marginBottom="48dp" />

    <Button
        android:id="@+id/button"
        android:layout_width="match_parent"
        android:layout_height="wrap_content"
        android:layout_alignParentBottom="true"
        android:layout_centerHorizontal="true"
        android:text="Clear"
        android:onClick="clearCanvas"/>

</RelativeLayout>
コードを今見る(MainActivity.java))
package com.oshimamasara.draw;

import androidx.appcompat.app.AppCompatActivity;

import android.os.Bundle;
import android.view.View;

public class MainActivity extends AppCompatActivity {
    private PaintView paintView;

    @Override
    protected void onCreate(Bundle savedInstanceState) {
        super.onCreate(savedInstanceState);
        setContentView(R.layout.activity_main);

        paintView = (PaintView) findViewById(R.id.canvas);
    }

    public void clearCanvas(View v) {
        paintView.clearCanvas();

    }
}
コードを今見る(PaintView.java))
package com.oshimamasara.draw;

import android.content.Context;
import android.graphics.Bitmap;
import android.graphics.Canvas;
import android.graphics.Color;
import android.graphics.Paint;
import android.graphics.Path;
import android.util.AttributeSet;
import android.util.Log;
import android.view.MotionEvent;
import android.view.View;

import static android.content.ContentValues.TAG;

public class PaintView extends View {
    public int width;
    public int height;
    private Bitmap mBitmap;
    private Canvas mCanvas;
    private Path mPath;
    private Paint mPaint;
    private float mX, mY;
    private static final float TOLERANSE=5;  //移動を感知する値
    Context context;


    public PaintView(Context context, AttributeSet attra) {
        super(context, attra);
        this.context = context;

        mPath = new Path();
        mPaint = new Paint();
        mPaint.setAntiAlias(true);
        mPaint.setColor(Color.BLACK);
        mPaint.setStyle(Paint.Style.STROKE);
        mPaint.setStrokeJoin(Paint.Join.ROUND);
        mPaint.setStrokeWidth(12f);
    }

    @Override
    protected void onSizeChanged(int w, int h, int oldw, int oldh){
        super.onSizeChanged(w,h,oldw,oldh);
        Log.d(TAG, "onSizeChanged  w & h::" + mBitmap);
        Log.d(TAG, "oldw & oldh::" + mBitmap);
        mBitmap = Bitmap.createBitmap(w, h, Bitmap.Config.ARGB_8888);
        Log.d(TAG, "Bitmap=" + mBitmap);
        mCanvas = new Canvas(mBitmap);
        Log.d(TAG, "Canvas=" + mCanvas);
    }

    @Override
    protected void onDraw(Canvas canvas){
        super.onDraw(canvas);
        canvas.drawPath(mPath, mPaint);
        Log.d(TAG, "onDraw=" + mPath);
        Log.d(TAG, "onDraw=" + mPaint);
    }

    private void startTouch(float x,float y){
        mPath.moveTo(x, y);
        mX = x;
        mY = y;
        Log.d(TAG, "startTouch  X:" + mX + "  Y:" + mY);
    }

    private void moveTouch(float x, float y){
        float dx = Math.abs(x - mX);  //Math.abs 絶対値
        float dy = Math.abs(y - mY);
        Log.d(TAG, "moveTouch::" + dx);
        Log.d(TAG, "moveTouch::" + dy);
        if(dx >= TOLERANSE || dy >= TOLERANSE){
            mPath.quadTo(mX, mY, (x+mX) / 2 , (y+mY) / 2); //移動値の制御
            mX = x;
            mY = y;
            Log.d(TAG, "move_X:" + mX + "  move_Y:" + mY);
        }
    }

    public void clearCanvas(){
        mPath.reset();
        invalidate();
    }

    private void upTouch(){
        mPath.lineTo(mX, mY);
    }

    @Override
    public boolean onTouchEvent(MotionEvent event) {
        float x = event.getX();
        float y = event.getY();

        switch (event.getAction()) {
            case MotionEvent.ACTION_DOWN:
                startTouch(x, y);
                invalidate();
                break;
            case MotionEvent.ACTION_MOVE:
                moveTouch(x, y);
                invalidate();
                break;
            case MotionEvent.ACTION_UP:
                upTouch();
                invalidate();
                break;
        }

        return true;
    }
}
まずは文字を書く部分を作成し、 AI への”画像投稿”準備をしたいと思います。スマホ上で文字を書いたり、落書きしようと思うと以下のような様な方法が挙げられるでしょう。
Canvasなどの Android 標準クラスを使ったペイント
Picasso や Glide などのライブラリを使ったペイント
ライブラリを使うと高機能な”ペイント”を実装できる一方で、理解に時間がかかったり、制約があったりするもの。今回は基本的な機能の ”Canvas” を使ってペイント機能を実装してみました。
詳しいプログラムは上記 GitHub をご参照頂くとして、 Android の Canvas を使った処理フローは上記の通り。画面にタップされたら onTouchEvent が True になって、 switch文を実行。最初にタップされた点の x, y 座標を取得し、画面をなぞった”値”が 5 を超えると、新たな座標値を取得し、最初の座標と移動したところの座標を”線”でなぞる、というもの。そして”なぞった値(mPath)”と”線(mPaint)”を画面に反映。
この mPath や mPaint を model に投入できれば予測値を返してもらえそうですね。
AIアプリに必要なライブラリの設定
コードを今見る(Appレベルのbuild.gradle))
apply plugin: 'com.android.application'

android {
    compileSdkVersion 29
    buildToolsVersion "29.0.2"
    defaultConfig {
        applicationId "com.oshimamasara.draw"
        minSdkVersion 15
        targetSdkVersion 29
        versionCode 1
        versionName "1.0"
        testInstrumentationRunner "androidx.test.runner.AndroidJUnitRunner"
    }
    buildTypes {
        release {
            minifyEnabled false
            proguardFiles getDefaultProguardFile('proguard-android-optimize.txt'), 'proguard-rules.pro'
        }
    }
    aaptOptions {
        noCompress "tflite"
    }
    compileOptions {
        sourceCompatibility JavaVersion.VERSION_1_8
        targetCompatibility JavaVersion.VERSION_1_8
    }
}

dependencies {
    implementation fileTree(dir: 'libs', include: ['*.jar'])
    implementation 'androidx.appcompat:appcompat:1.1.0'
    implementation 'androidx.constraintlayout:constraintlayout:1.1.3'
    testImplementation 'junit:junit:4.12'
    androidTestImplementation 'androidx.test🏃1.2.0'
    androidTestImplementation 'androidx.test.espresso:espresso-core:3.2.0'

    implementation 'com.jakewharton:butterknife:10.0.0'
    implementation 'org.tensorflow:tensorflow-lite:2.0.0'
    annotationProcessor 'com.jakewharton:butterknife-compiler:10.0.0'
    implementation 'com.android.support.constraint:constraint-layout:1.1.3'
    //noinspection GradleCompatible
    implementation 'com.android.support:appcompat-v7:28.0.0'
}
これから AIアプリを作成していくにあたって、必要なライブラリの環境を整えておきましょう。上記のように Appレベルの build.gradle を変更し、 SyncNow。
大まかな内容としては、 aaptOptions はビルド速度の最適化を行ってくれる機能で、 noCompressは APK を作成しても対象ファイル(tflite)保存されないという設定。そして compileOptions については、コードの互換性設定。これがないと今回のライブラリは使用できず、エラーがでます。あとは View を手伝ってくれる butterknife と AI機能を手伝ってくれる TensorFlow Lite の追加。
画像判定できるAIアプリのレイアウト(activity_main.xml)
コードを今見る(activity_main.xml))
<?xml version="1.0" encoding="utf-8"?>
<LinearLayout xmlns:android="http://schemas.android.com/apk/res/android"
    xmlns:tools="http://schemas.android.com/tools"
    android:layout_width="match_parent"
    android:layout_height="match_parent"
    tools:context=".MainActivity"

    android:id="@+id/activity_main"
    android:paddingBottom="0dp"
    android:paddingLeft="10dp"
    android:paddingRight="10dp"
    android:paddingTop="10dp"
    android:background="@android:color/black"
    android:orientation="vertical"
    >

    <com.oshimamasara.draw.PaintView
        android:id="@+id/canvas"
        android:layout_width="match_parent"
        android:layout_height="300dp"
        android:background="@android:color/white"/>

    <LinearLayout
        android:layout_width="match_parent"
        android:layout_height="wrap_content"
        android:orientation="vertical">

        <LinearLayout
            android:layout_width="match_parent"
            android:layout_height="wrap_content"
            android:orientation="horizontal">

            <Button
                android:id="@+id/predict_button"
                android:layout_width="0dp"
                android:layout_height="wrap_content"
                android:layout_weight="1"
                android:layout_margin="4dp"
                android:background="@android:color/holo_blue_dark"
                android:textColor="@android:color/white"
                android:textSize="20dp"
                android:text="判定" />

            <Button
                android:id="@+id/clear_button"
                android:layout_width="0dp"
                android:layout_height="wrap_content"
                android:layout_weight="1"
                android:layout_margin="4dp"
                android:background="@android:color/holo_red_light"
                android:textColor="@android:color/white"
                android:textSize="20dp"
                android:text="消す"
                android:onClick="clearCanvas"/>

        </LinearLayout>

        <TextView
            android:id="@+id/text_result"
            android:layout_width="match_parent"
            android:layout_height="wrap_content"
            android:layout_weight="1"
            android:textSize="28sp"
            android:text=""
            android:textColor="@android:color/white"
            android:textAppearance="?android:attr/textAppearanceMedium" />

    </LinearLayout>

    <LinearLayout
        android:id="@+id/inference_preview"
        android:layout_width="match_parent"
        android:layout_height="wrap_content"
        android:visibility="gone"
        android:orientation="vertical">

        <TextView
            android:id="@+id/predict_text"
            android:layout_width="match_parent"
            android:layout_height="wrap_content"
            android:text="@string/preview_scaled"
            android:textColor="@android:color/white"
            android:textAppearance="?android:attr/textAppearanceMedium" />

        <ImageView
            android:id="@+id/preview_image"
            android:layout_width="50dp"
            android:layout_height="50dp"
            android:layout_marginTop="5dp" />
    </LinearLayout>
</LinearLayout>
書いた画像を AI に判定してもらおうと思うと、「判定ボタン」と「リセットボタン」が必要に。先程までは RelativeLayout で画面構成していましたが、ボタン等の要素が追加されることから LinearLayout に変更。
LinearLayout 扱いやすいレイアウト、部品を縦や横に並べて配置できる
RelativeLayout 部品同士の位置関係で配置、部品が重複することも
あと今回は、判定結果の文字以外に AI が読み込んだ画像のプレビューも表示(preview_image)。自分で書いた文字を AI がどんなふうに読み込んで予測するのか、興味深いですよね。次は AI 部分についてご紹介していきましょう。
Androidアプリへモデルファイルを読み込ませる
コードを今見る(AI.java))
package com.oshimamasara.draw;

import android.app.Activity;
import android.content.res.AssetFileDescriptor;
import android.graphics.Bitmap;
import android.os.SystemClock;
import android.util.Log;
import org.tensorflow.lite.Interpreter;
import java.io.FileInputStream;
import java.io.IOException;
import java.nio.ByteBuffer;
import java.nio.ByteOrder;
import java.nio.channels.FileChannel;
import java.util.ArrayList;
import java.nio.MappedByteBuffer;

public class AI {

    private final String TAG = this.getClass().getSimpleName();

    private Interpreter tflite;
    private ByteBuffer inputBuffer = null;
    private float[][] abcOutput = null;
    private static final String MODEL_PATH = "abc.tflite";
    private static final int NUMBER_LENGTH = 26;
    private static final int DIM_BATCH_SIZE = 1;
    private static final int DIM_IMG_SIZE_X = 128;
    private static final int DIM_IMG_SIZE_Y = 128;
    private static final int DIM_PIXEL_SIZE = 1;
    private static final int BYTE_SIZE_OF_FLOAT = 4;

    public AI(Activity activity){
        try{
            tflite = new Interpreter(loadModelFile(activity));
            inputBuffer =
                    ByteBuffer.allocateDirect(
                            BYTE_SIZE_OF_FLOAT * DIM_BATCH_SIZE * DIM_IMG_SIZE_X * DIM_IMG_SIZE_Y * DIM_PIXEL_SIZE);

            inputBuffer.order(ByteOrder.nativeOrder());
            abcOutput = new float[DIM_BATCH_SIZE][NUMBER_LENGTH];
        } catch (IOException e) {
            Log.e(TAG, "IOException loading the tflite file");
        }
    }

    protected void runInference() {
        tflite.run(inputBuffer, abcOutput);
    }

    public int classify(Bitmap bitmap) {
        if (tflite == null) {
            Log.e(TAG, "Image classifier has not been initialized; Skipped.");
        }
        preprocess(bitmap);
        runInference();
        return postprocess();
    }

    private int postprocess() {
        ArrayList predict = new ArrayList<>();

        for (int i = 0; i < abcOutput[0].length; i++) {
            float value = abcOutput[0][i];
            Log.d(TAG, "Output for " + Integer.toString(i) + ": " + Float.toString(value));
            predict.add(value);
            Log.d(TAG, "predict★ :  " + predict);
        }
        Log.d(TAG, "predict最終★ :  " + predict);

        Float out = predict.get(0);
        int index = 0;

        for (int e = 0; e < predict.size(); e++)
        {
            if (out < predict.get(e))
            {
                out = predict.get(e);
                index = e;
            }
        }
        Log.d(TAG, "最大値★ :  " + out);
        Log.d(TAG, "INDEX★ :  " + index);
        return index;
    }

    private MappedByteBuffer loadModelFile(Activity activity) throws IOException  {
        AssetFileDescriptor fileDescriptor = activity.getAssets().openFd(MODEL_PATH);
        FileInputStream inputStream = new FileInputStream(fileDescriptor.getFileDescriptor());
        FileChannel fileChannel = inputStream.getChannel();
        long startOffset = fileDescriptor.getStartOffset();
        long declaredLength = fileDescriptor.getDeclaredLength();
        return fileChannel.map(FileChannel.MapMode.READ_ONLY, startOffset, declaredLength);
    }

    private void preprocess(Bitmap bitmap) {
        if (bitmap == null || inputBuffer == null) {
            return;
        }
        Log.d(TAG, "preprocess bimap★ :  " + bitmap);
        Log.d(TAG, "preprocess inputBuffer★ :  " + inputBuffer);
        inputBuffer.rewind();

        int width = bitmap.getWidth();
        int height = bitmap.getHeight();
        Log.d(TAG, "preprocess w★ :  " + width);
        Log.d(TAG, "preprocess h★ :  " + height);

        long startTime = SystemClock.uptimeMillis();

        int[] pixels = new int[width * height];
        bitmap.getPixels(pixels, 0, width, 0, 0, width, height);
        Log.d(TAG, "preprocess pixel w★ :  " + width);
        Log.d(TAG, "preprocess pixel h★ :  " + height);

        for (int i = 0; i < pixels.length; ++i) {
            Log.d(TAG, "preprocess pixels.length★ :  " + pixels.length);
            int pixel = pixels[i];
            int channel = pixel & 0xff;
            inputBuffer.putFloat(0xff - channel);
        }
        long endTime = SystemClock.uptimeMillis();
        Log.d(TAG, "Time cost to put values into ByteBuffer: " + Long.toString(endTime - startTime));
    }
}
Androidアプリへの”モデル”のセットは大きく分けて 2つ行う必要があります。
モデルファイル .tflite の設置
モデルファイル .tflite の読み込みプログラム
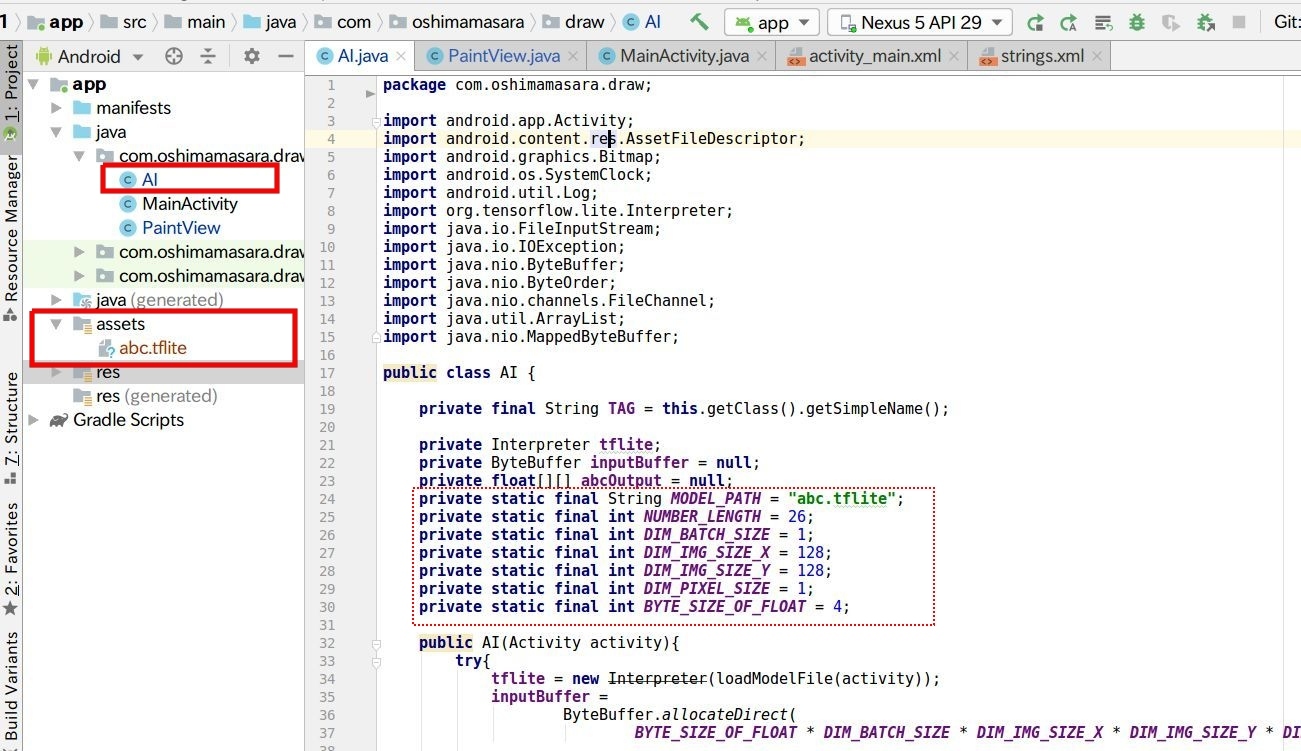
まず「モデルファイル .tflite の設置」については、 Android Studio 左サイドバーを Project 表示に切り替えて、app/src/main に新規フォルダ: assets を追加。そしてその assets に .tflite ファイルをコピペします。 assets というフォルダ名は”固定値”です、注意しましょう。
「モデルファイル .tflite の読み込みプログラム」をご紹介する前に、今回の AI が行う処理フローを確認しましょう。上図に示すように、まずは一旦スマホ上で書かれた文字(画像)を 128×128 に小さくします。この 128 という数値は、モデル(abc.tflite)を作成した時の画像サイズ。そしてモデルで処理できるサイズのデータを abc.tflite に投入し、出力値を得る、というのが大まかな流れです。
tfliteの入出力サイズを確認する方法
今回学習済みのモデル abc.tflite と mnist.tflite という 2つのファイルを使用しますが、このモデルを使うにあたっての”サイズ"って、分かりませんよね。自分でラーニングしてモデルファイルを作成したり、 モデル作成の過程を示す Jupyter Notebook があればいいですが、そうでない場合はチョット困ります。さてこんな場合どうすれば先ほど紹介したような ”128” という値を確認できるでしょうか?
今回のようにモデル・ファイルだけあって、モデルの入力値や出力値を確認したいとき、 Netron というソフトウェアが便利。今回のような tflite ファイルだけある状態でも、入力と出力の値を確認することができます(上図参照)。
アプリとモデルを接続
モデル abc.tflite の読み込みは上図の通りで、入力画像をモデル処理する時はほぼ同じような書き方をします。ここでのポイントは、
NUMBER_LENGTH
DIM_IMG_SIZE_X
DIM_IMG_SIZE_Y
の 3つの値。まず NUMBER_LENGTH = 26 は、予測結果の種類。今回はローマ字なので 26、これが数字認識の MNIST だったら NUMBER_LENGTH = 10 になります。先ほどの Netron を使うと出力値に値しますね。
そして DIM_IMG_SIZE_X と DIM_IMG_SIZE_Y は、モデル作成時(機械学習時)設定した画像サイズ。 DIM_IMG_SIZE_X と DIM_IMG_SIZE_Y 、それから DIM_PIXEL_SIZE によってモデルに投入される”バッファー値”(画像データのサイズ)が決定。 DIM_IMG_SIZE_X と DIM_IMG_SIZE_Y は、 Netron の入力値ですね。そして DIM_PIXEL_SIZE は MINIST など白黒画像系は概ね 1。
それらのデータを元に、モデルに投入される画像データサイズ:inputBuffer と予測値:abcOutput が決まります。
あとは TensorFlow のクラスに inputBuffer と abcOutput を設定すれば予測値を Get 可能。
予測値を得る一連の処理過程は、上図のコード(AI.java)にて集約されています。
最初に実行される preprocess() メソッドでは、画像サイズの変更を実行。そして runInference() で TensorFlowクラスを用いて、予測の準備。最終的に postprocess() で入力データを AIで判定し、各アルファベットとの照合率を計算。一番照合率の高いものを return として出力するようにセットしています(下図参照)。
上記画像の下部後半プログラムは、 tfliteファイルを読み込む定型文のようなもの。モデルファイルの読み込みに関する宣言文です。
さあこれで AI.java によって"予測値"が出力されます。これを見やすいように MainActivity.java の方で調整しましょう。
AIによる予測値の表示
上記コードを今見る(MainActivity.java))
package com.oshimamasara.draw;

import androidx.appcompat.app.AppCompatActivity;

import android.graphics.Bitmap;
import android.os.Bundle;
import android.util.DisplayMetrics;
import android.util.Log;
import android.view.View;
import android.widget.ImageView;
import android.widget.LinearLayout;
import android.widget.TextView;

import butterknife.BindView;
import butterknife.ButterKnife;

public class MainActivity extends AppCompatActivity {
    //private PaintView paintView;
    private final String TAG = this.getClass().getSimpleName();

    private static final int PIXEL_WIDTH = 128;
    private AI abcClassifier;
    @BindView(R.id.predict_button)
    View predictButton;

    @BindView(R.id.clear_button)
    View clearButton;

    @BindView(R.id.text_result)
    TextView mResultText;

    @BindView(R.id.predict_text)
    TextView mPredictText;

    @BindView(R.id.canvas)
    PaintView paintView;

    @BindView(R.id.preview_image)
    ImageView previewImage;

    @BindView(R.id.inference_preview)
    LinearLayout inferencePreview;

    @Override
    protected void onCreate(Bundle savedInstanceState) {
        super.onCreate(savedInstanceState);
        setContentView(R.layout.activity_main);
        ButterKnife.bind(this);
        abcClassifier = new AI(this);
        DisplayMetrics metrics = new DisplayMetrics();
        getWindowManager().getDefaultDisplay().getMetrics(metrics);
        paintView.onSizeChanged(metrics);

        predictButton.setOnClickListener(new View.OnClickListener() {
            @Override
            public void onClick(View v) {
                onPredictClicked();
            }
        });
        //paintView = (PaintView) findViewById(R.id.canvas);
    }

    private void onPredictClicked() {
        inferencePreview.setVisibility(View.VISIBLE);
        Bitmap scaledBitmap = Bitmap.createScaledBitmap(paintView.getBitmap(), PIXEL_WIDTH, PIXEL_WIDTH, false);
        int digit = abcClassifier.classify(scaledBitmap);

        previewImage.setImageBitmap(scaledBitmap);
        if (digit >= 0) {
            Log.d(TAG, "Found Digit = " + digit);
            //String[] answere = {"0", "1", "2", "3", "4", "5", "6", "7", "8", "9"};
            String[] answere = {"A", "B", "C", "D", "E", "F", "G", "H", "I", "J", "K", "L", "M", "N", "O", "P", "Q", "R", "S", "T", "U", "V", "W", "X", "Y", "Z"};
            String predict = answere[digit] ;
            Log.d(TAG, "predict No,:" + predict);

            mResultText.setText(getString(R.string.found_digits, predict));
            mPredictText.setText(getString(R.string.preview_scaled));

        } else {
            mResultText.setText(getString(R.string.not_detected));
        }
    }

    public void clearCanvas(View v) {
        paintView.clearCanvas();
    }
}
AI.javaによって”予測値”(digit) が出力されます。しかし出力される値は”数値”。今回はローマ字の判定結果を欲しいので、”数値”から”ローマ字”に変換する必要があります。
判定結果は数値の digit で出力され、その内容は digit = 0 = A、 digit = 1 = B という風に”数字”と”ローマ字”はリンクしています。このことを利用し、AからZまで入った配列:answere を用意し、 answereの中の digit 番目の文字を出力、とすればローマ字の判定結果を獲得できます。
上記コードを今見る(PaintView.java))
package com.oshimamasara.draw;

import android.content.Context;
import android.graphics.Bitmap;
import android.graphics.Canvas;
import android.graphics.Color;
import android.graphics.Paint;
import android.graphics.Path;
import android.util.AttributeSet;
import android.util.DisplayMetrics;
import android.util.Log;
import android.view.MotionEvent;
import android.view.View;

import static android.content.ContentValues.TAG;
import static android.content.ContentValues.TAG;


public class PaintView extends View {
    public int width;
    public int height;
    private Bitmap mBitmap;
    private Canvas mCanvas;
    private Path mPath;
    private Paint mPaint;
    private float mX, mY;
    private static final float TOLERANSE=5;
    Context context;
    private Paint mBitmapPaint = new Paint(Paint.DITHER_FLAG);


    public PaintView(Context context, AttributeSet attra) {
        super(context, attra);
        this.context = context;

        mPath = new Path();
        mPaint = new Paint();
        mPaint.setAntiAlias(true);
        mPaint.setColor(Color.BLACK);
        mPaint.setStyle(Paint.Style.STROKE);
        mPaint.setStrokeJoin(Paint.Join.ROUND);
        mPaint.setStrokeWidth(40f);
    }

    public Bitmap getBitmap() {
        return mBitmap;
    }

    //@Override
    protected void onSizeChanged(DisplayMetrics metrics){
        //super.onSizeChanged(w,h,oldw,oldh);
        //Log.d(TAG, "onSizeChanged  w & h::" + mBitmap);
        //Log.d(TAG, "oldw & oldh::" + mBitmap);
        int height = metrics.widthPixels;
        int width = metrics.widthPixels;
        mBitmap = Bitmap.createBitmap(width, height, Bitmap.Config.ARGB_8888);
        Log.d(TAG, "Bitmap=" + mBitmap);
        mCanvas = new Canvas(mBitmap);
        Log.d(TAG, "Canvas=" + mCanvas);
    }

    @Override
    protected void onDraw(Canvas canvas){
        super.onDraw(canvas);
        mCanvas.drawColor(Color.WHITE);
        mCanvas.drawPath(mPath, mPaint);
        Log.d(TAG, "onDraw=" + mPath);
        Log.d(TAG, "onDraw=" + mPaint);
        canvas.drawBitmap(mBitmap,0,0, mBitmapPaint);
    }

    private void startTouch(float x,float y){
        mPath.moveTo(x, y);
        mX = x;
        mY = y;
        Log.d(TAG, "startTouch  X:" + mX + "  Y:" + mY);
    }

    private void moveTouch(float x, float y){
        float dx = Math.abs(x - mX);
        float dy = Math.abs(y - mY);
        Log.d(TAG, "moveTouch::" + dx);
        Log.d(TAG, "moveTouch::" + dy);
        if(dx >= TOLERANSE || dy >= TOLERANSE){
            mPath.quadTo(mX, mY, (x+mX) / 2 , (y+mY) / 2);
            mX = x;
            mY = y;
            Log.d(TAG, "move_X:" + mX + "  move_Y:" + mY);
        }
    }

    public void clearCanvas(){
        mPath.reset();
        invalidate();
    }

    private void upTouch(){
        mPath.lineTo(mX, mY);
    }

    @Override
    public boolean onTouchEvent(MotionEvent event) {
        float x = event.getX();
        float y = event.getY();

        switch (event.getAction()) {
            case MotionEvent.ACTION_DOWN:
                startTouch(x, y);
                invalidate();
                break;
            case MotionEvent.ACTION_MOVE:
                moveTouch(x, y);
                invalidate();
                break;
            case MotionEvent.ACTION_UP:
                upTouch();
                invalidate();
                break;
        }

        return true;
    }
}
あとは先程までは PaintView で mPath と mPaint を Canvas に渡していましたが、今度は AI判定しますので Canvas ではなく モデルにデータを投入する必要があります。そのため PaintView で得られるデータをモデル用の Bitmap 形式に変換する必要があります。上図のように onDraw() 部分を変更しましょう。
これで ABC を判定できる AIアプリができました。エミュレーターを実行して内容を確認してみましょう。
よくあるエラー
Gradleエラー
Static interface methods are only supported starting with Android N (--min-api 24): void butterknife.Unbinder.lambda$static$0()
appレベルの build.gradle を編集する際に遭遇しやすいエラー。 Java の互換性をサポートする
compileOptions {
    sourceCompatibility JavaVersion.VERSION_1_8
    targetCompatibility JavaVersion.VERSION_1_8
}
を書き忘れていませんか?
tfliteエラー
java.lang.NullPointerException: Attempt to invoke virtual method 'void org.tensorflow.lite.Interpreter.run(java.lang.Object, java.lang.Object)' on a null object reference
エミュレーター実行時によく遭遇する上記エラー。 tfliteファイルは正しく assets 内に保存されていますか?
予測結果、同じ値ばかり
PaintView.java 内の onDraw() 内にキャンバスカラー設定されていますか? mCanvas.drawColor(Color.WHITE);が設定されていないと、 AI は”白黒”を判定できません。
あまりいい予測値でない
モデル作成時のラーニング方法とスマホ側のキャンバス解像度、線の太さ、フィルター等が影響してくるでしょう。今回のケースではキャンバスサイズ 1080×1080 を 128 にリサイズして、モデルに投入。手書き文字をおよそ 1/8 まで縮小しますので、”書いた画像”と”ラーニング時の画像”が乖離するため悪い予測値に。 この問題は、キャンバスサイズの解像度を調整するとか、256pxなどの画像データでラーニングし直すなどいくつかの対策が必要でしょう。
MNISTのモデルをAndroidにセットしてみる
手書きの数字文字画像 MNIST を使ったモデル mnist.tflite を使用して、数字を AI先生に判定したもらおうと思います。
まずモデルファイルを abc.tflite から mnist.tflite に変更し、 AI.java の”イメージサイズ”も 28 に。あと予測値の種類を表す NUMBER_LENGTH も 26から 10 に変更。 ”10” については、この mnist.tflite は、 0から 9の予測値を返してくれるからです(下図参照)。
Netron を使って mnist.tflite の内容を確認した結果
あとは MainActivity.java の answere 配列を 0 〜 9 に変更すればOK。エミュレーターを起動して、数字を描いてみましょう。
このように ”ペイント” と ”モデル” の基本的な操作方法がわかれば、いろいろなモデルを使って AI判定してもらうことができますね。(MNIST部分の動画 )
これから私達の生活や仕事をもっと手伝ってくれる AI。自分でも AIアプリ作れたらおもしろくありませんか?
今回は AI アプリの”肝”であるラーニングを実行せず、既に仕上がったラーニング済みのモデルを使用しました。実際に自分で AIアプリを作ってみると、「もっと精度を上げたい」「違う文字を認識させたい」など色々思うところでしょう。
そのためにはラーニングに欠かせない Python を知る必要がありますし、アプリ側の認識レベルを調整したい場合は Java や Swift などアプリ開発に必要なプログラミング言語を知る必要があります。
「AI も Java も両方なんてムリ」「時間がない」、と思っていませんか?
まず AI(Python) も Java も両方、、、大丈夫です、全部を覚える必要はありません。 エディタがエスコートしてくれます。「時間がない」、これは大きな問題でしょう。しかし、仮にオンライン型のプログラミングスクールを受講できたとしたら、どうでしょう? 好きな”場所”で好きな”時”に学習を進めていくことができます。”時間問題”の大きな糸口になるのではないでしょうか?
現在 CodeCamp では、 AI社会を生きる、活きたいこれからの方を応援すべく 「Pythonデータサイエンスコース」 と 「テクノロジーリテラシー 速習コース」 を提供中。
「オンラインで Python学習? 大丈夫?」「先生、こわいのかな?」 と不安、疑問を持つ方も多いでしょう。そんな時は『無料体験』でレッスンの予約から受講、テキスト確認まで、まるで受講生さながらの体験をしてみませんか?
受講料はかかりますが、将来への不安、このあたりで踏ん切りをつけてみませんか? ご興味ある方は 公式ページ よりご確認下さい。
 Android StudioとGitHubを連携する方法Android studio
![[プログラミングを子供にやらせたい親御さん必見]コンピューターは仮面ライダークウガとアギトを見分けられるか?](https://mash-jp.cdn.codecamp.jp/production/posts/34701/dd583da40b65336b60a5956189faa82965fe866b.34772.phone.jpg?1568944252) [プログラミングを子供にやらせたい親御さん必見]コンピューターは仮面ライダークウガとアギトを見分けられるか?Android studio
[プログラミングを子供にやらせたい親御さん必見]コンピューターは仮面ライダークウガとアギトを見分けられるか?Android studio 【はじめてのAndroidアプリ開発】寄付機能の体験(テスト課金&実課金)Android studio
 Android Studioのインストールからエミュレーターの起動まで/Windows編Android studio
 【はじめてのAndroidアプリ開発】バナー広告の設定Android studio
 【Mac版】初心者のためのAndroid Studioインストール方法まとめAndroid studio


