- 公開日: 2020年05月03日
【JavaScriptを好きになろう】ゲームしやすい画面の設定方法

JavaScript製ゲームは、ユーザーの端末問わず気軽に楽しめる一方で、端末画面の違いによる影響も。
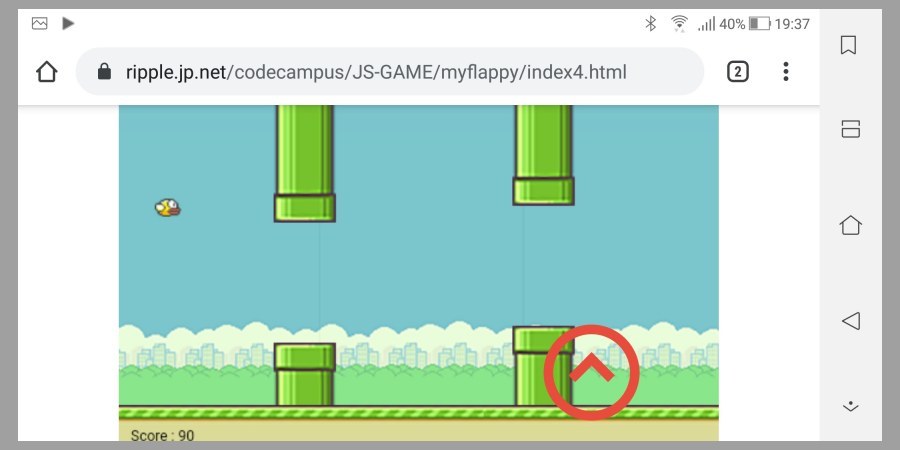
例えば先日ご紹介した 「JavaScript製 Flappy Bird」、スマホを縦画面のままページを開くと操作ボタンが表示されなくプレイできません。

今回は JavaScript製ゲームをより快適に楽しめるよう、 JavaScriptで端末判定を行ったり、画面判定を行って、プレイしやすいような環境設定の作り方をご紹介します。
【JavaScriptを好きになろう】JavaScriptでゲームしやすい画面の設定方法
今回の目標:ユーザーの端末状況を判定し、プレイ画面まで案内する
JavaScript製のゲームは HTML の canvas タグを使用して、プレイフィールドを出力しています。 そのため予め端末環境、端末サイズを考慮して canvas サイズを設計し、ゲームプログラムを組むのが一般的。
ユーザーの一般的な使用環境である 「スマホ縦画面」 サイズを元にゲームを設計できれば問題ないでしょうが、横スクロール系のゲームの場合、スマホを横にしたサイズでゲーム開発すると思います。
こうしたスマホの横画面を意識したゲーム開発、 XCode や Android Studio、 Unity を使えばアプリ側で画面操作をコントロールできますが、今回の様なブラウザベースの JavaScript ではチョット悩ましいポイントに。
CSS の viewポイント設定によっては、以下のように本来あるはずのボタンが表示されずにゲームをプレイできない、という事態もあるでしょう。
こうした問題に対処する手順を、順を追ってご紹介していきます。
スマホが縦か横か検知・確認するJavaScriptプログラム
まず前提として、スマホの横画面サイズで 2D ゲームを JavaScript で開発したとします。それを元にユーザーの端末環境に合わせてプレイできるように設定していきます。
ベースとなる横スクロールの 2Dゲーム
上図のコードを今確認する
<!--
ベース
-->
<!DOCTYPE html>
<html lang="ja">
<head>
    <meta charset="UTF-8" />
    <title>Flappy Bird</title>
    <meta name="viewport" content="width=device-width, user-scalable=no">
    <style>
    canvas{
        background-color:#eee;
    }
    body{
        max-width:900px;
        margin:0 auto;
        text-align:center;
    }
    .button {
        display: none;
        vertical-align: middle;
        text-align:center;
        margin:32px;
    }
    .button div {
        display: inline-block;
        border-radius: 50%;
    }
    .button div:hover .up{
        border: 0.5em solid #e74c3c;
    }
    .button div:hover .up:after {
        border-top: 0.5em solid #e74c3c;
        border-right: 0.5em solid #e74c3c;
    }
    .up {
        display: inline-block;
        width: 4em;
        height: 4em;
        border: 0.5em solid #333;
        border-radius: 50%;
        margin-right: 1.5em;
    }

    .up:after {
        content: '';
        display: inline-block;
        margin-top: 1.3em;
        /*margin-left: 0.6em;*/
        width: 1.2em;
        height: 1.2em;
        border-top: 0.5em solid #333;
        border-right: 0.5em solid #333;
        -moz-transform: rotate(-45deg);
        -webkit-transform: rotate(-45deg);
        transform: rotate(-45deg);
    }

    /*canvasの上にボタンをフロート*/
    .content{
        display:inline-block;
        position:relative;
    }
    .content div {
        position:absolute;
        bottom:5px;
        right:5px;
    }
    /*canvasの上にボタンをフロート おわり*/
    @media (max-width:900px){
        .button {
            /*display: inline-block;*/
            display: inline-block;
            vertical-align: middle;
            text-align:center;
            margin:32px;
        }
    }
    </style>
</head>
<body>
<div class="content">
    <canvas id="canvas" width="500" height="300"></canvas>
    <div id="upButton" class="button">
        <div>
            <span class="up"></span>
        </div>
    </div>
</div>

<script>
    var cvs = document.getElementById("canvas");
    var ctx = cvs.getContext("2d");

    var bg = new Image(); //背景
    var bird = new Image(); //鳥
    var fg = new Image(); //地面
    var pipeNorth = new Image(); //ドカン上
    var pipeSouth = new Image(); //ドカン下

    bg.src = "bg.png";
    bird.src = "bird.png";
    fg.src = "fg.png";
    pipeNorth.src = "pipeNorth.png";
    pipeSouth.src = "pipeSouth.png";

    var bX = 30;  //鳥の表示値
    var bY = 20;  //鳥の表示位置
   var gap = 100;  //ドカンの縦幅
   var constant;
   var score = 0;

    var pipe = [];
    pipe[0] = {
        x : cvs.width, //canvas幅
        y : 0
    };

    // キーボード操作
    document.addEventListener("keydown",moveUp);
    function moveUp(e){
        bY -= 25;
    }
    // ボタン操作
    var upButton = document.getElementById("upButton");
    upButton.addEventListener("touchstart", touchButton);
    function touchButton(e){
        bY -= 25;
    }

    function reload() {
        location.reload();
    }

    function draw(){
        ctx.drawImage(bg,0,0);
        ctx.drawImage(bird,bX,bY);
        ctx.drawImage(fg,0,cvs.height - fg.height);
        for(var i=0 ; i < pipe.length; i++){
            constant = pipeNorth.height+gap;
            ctx.drawImage(pipeNorth,pipe[i].x,pipe[i].y);
            ctx.drawImage(pipeSouth,pipe[i].x,pipe[i].y+constant);
            pipe[i].x--;

            if( pipe[i].x == 300 ){  //ドカン左端位置が200進んだら(200 = canvas幅:500 - ドカン左端pipe[i].x 300)
                pipe.push({
                    x : cvs.width,
                    y : Math.floor(Math.random()*pipeNorth.height)-pipeNorth.height
                });
            }

            //ゲームオーバーのパターン
            if( bX + bird.width >= pipe[i].x && bX <= pipe[i].x + pipeNorth.width && (bY <= pipe[i].y + pipeNorth.height || bY+bird.height >= pipe[i].y+constant) || bY + bird.height >=  cvs.height - fg.height){
                ctx.fillStyle = "red"; //カラー
                ctx.fillText("ゲームオーバー  3秒後リスタート", cvs.width/2, cvs.height/2); //表示内容、位置
                //setTimeout(reload, 3000);
            }
            if(pipe[i].x == bX){
                score++;
            }
        }
        bY += 1;

        ctx.fillStyle = "#000"; //カラー
        ctx.font = "16px"; //大きさ
        ctx.fillText("点数 : " + score + ' point',10,cvs.height-20); //表示内容、位置
        requestAnimationFrame(draw);
    }

    draw();
</script>
</body>
</html>
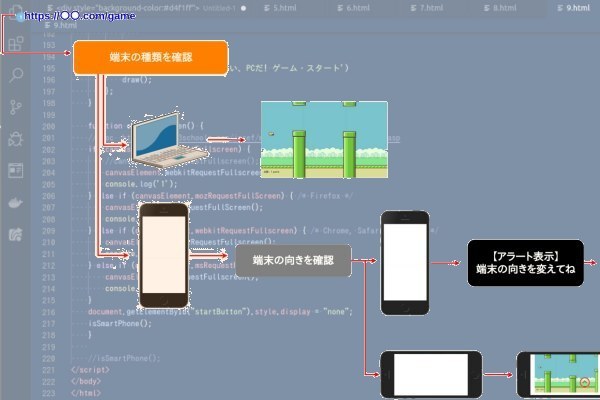
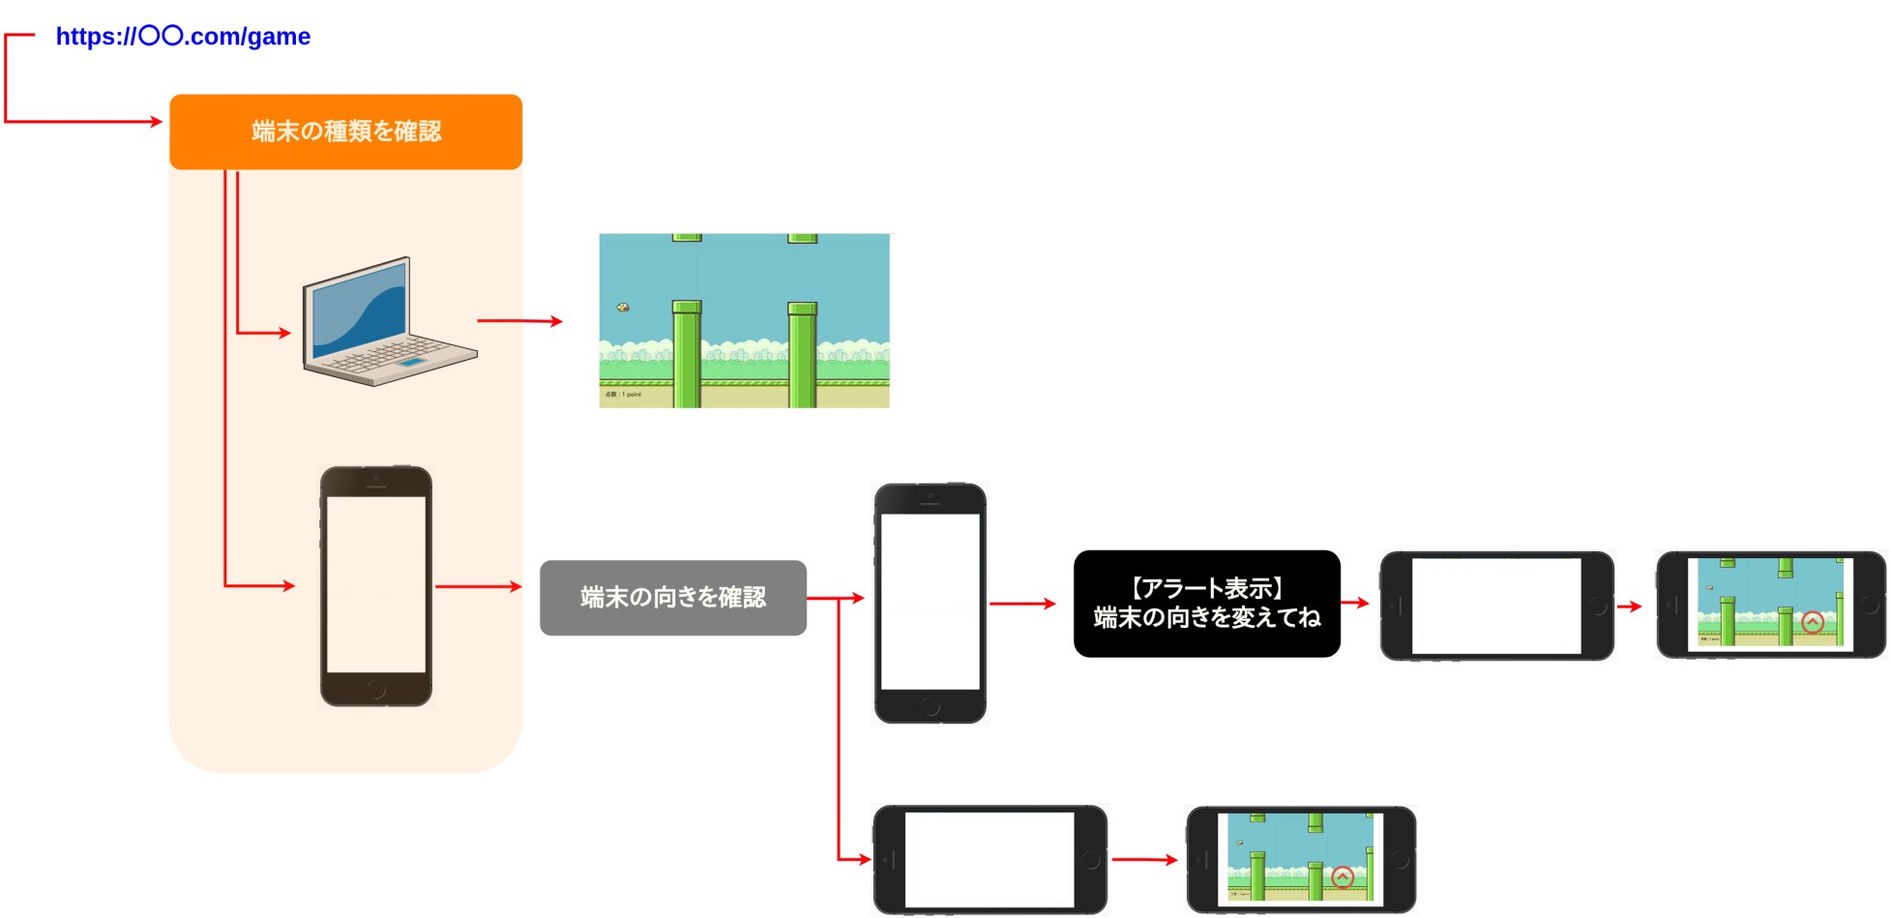
最初からユーザーが横画面でゲームの URL にアクセスしてくれればいいのですが、概ね縦画面でしょう。このスマホの画面処理、 JavaScript でできることは端末の "縦・横" を検知し、縦向きだったら横にしてね、とアナウンスできる程度。流れとしては下図のように。
ここでのポイントは、制御冒頭の 「端末の向きを検知」 ですね。 JavaScript で端末向きを検知するプログラムは以下のような方法があります。
<script>
function isSmartPhone() {
    if (Math.abs(window.orientation) == 90) {
        console.log('横向き!');
    } else {
        console.log('縦向き!');
    }
}
isSmartPhone();
</script>
【上記プログラム実行結果】
上図のコードを今確認する
<!DOCTYPE html>
<html lang="ja">
<head>
    <meta charset="UTF-8" />
    <title>Flappy Bird(画面向き)</title>
    <meta name="viewport" content="width=device-width, user-scalable=no">
    <style>
    canvas{
        background-color:#eee;
    }
    </style>
</head>
<body>
<canvas id="canvas" width="500" height="300"></canvas>

<script>
function isSmartPhone() {
    if (Math.abs(window.orientation) == 90) {
        console.log('横向き!');
        console.log('window.orientation: ' + window.orientation);
        console.log('Math.abs(window.orientation): ' + Math.abs(window.orientation));
    } else {
        console.log('縦向き!');
        console.log('window.orientation: ' + window.orientation);
        console.log('Math.abs(window.orientation): ' + Math.abs(window.orientation));
    }
}
isSmartPhone();
</script>
</body>
</html>
画面情報を取得できる window.orientation を使用して、画面の向きを検知し、ログに情報を出力しています。現在はログ出力ですが、ゲームの場合だったら、横画面の時はゲームスタート、縦画面の時は「横にしてね」とアナウンス、パソコン画面の時は... パソコン画面の時の制御文も必用ですね。上記プログラムをパソコン画面で実行すると以下のように。
今はスマホの画面向きだけを気にしていましたが、その前にユーザーがスマホで開いているかどうかを確認する必要がありますね。
ユーザーの端末環境を確認するJavaScriptプログラム
<script>
function isSmartPhone() {
    if (navigator.userAgent.match(/iPhone|Android.+Mobile/)){
        console.log('スマホだ!');
    } else{
        console.log('スマホじゃない、PCだ!')
    };
}
isSmartPhone();
</script>
上図のコードを今確認する
<!DOCTYPE html>
<html lang="ja">
<head>
    <meta charset="UTF-8" />
    <title>Flappy Bird(端末チェック)</title>
    <meta name="viewport" content="width=device-width, user-scalable=no">
    <style>
    canvas{
        background-color:#eee;
    }
    </style>
</head>
<body>
<canvas id="canvas" width="500" height="300"></canvas>

<script>
function isSmartPhone() {
    if (navigator.userAgent.match(/iPhone|Android.+Mobile/)){
        console.log('スマホだ!');
    } else{
        console.log('スマホじゃない、PCだ!')
    };
}
isSmartPhone();
</script>
</body>
</html>
今の Webページを開いているユーザーの端末情報は、 navigator.userAgent.match() で取得可能。 もしスマホで iPhone か Androidで開いていたら 「スマホだ」 と出力、そうでない場合は 「スマホじゃない」 と表示するようにセットしています。今回のゲームの場合であれば、下図のように 「スマホだ」 → 「縦か? 横か?」 と確認処理していけば OK。
上図のコードを今確認する
<!DOCTYPE html>
<html lang="ja">
<head>
    <meta charset="UTF-8" />
    <title>Flappy Bird(端末チェック)</title>
    <meta name="viewport" content="width=device-width, user-scalable=no">
    <style>
    canvas{
        background-color:#eee;
    }
    </style>
</head>
<body>
<canvas id="canvas" width="500" height="300"></canvas>

<script>
function isSmartPhone() {
    if (navigator.userAgent.match(/iPhone|Android.+Mobile/)){
        console.log('スマホだ!');
        //スマホ画面向きの確認
        if (Math.abs(window.orientation) == 90) {
            console.log('横向き!ゲーム・スタート');
        } else {
            console.log('縦向き!横にしよう!');
        }
    } else{
        console.log('スマホじゃない、PCだ! ゲーム・スタート')
    };
}
isSmartPhone();
</script>
</body>
</html>
今回は 「スマホかどうか」 の判定ですが、その他にも OS の情報や言語の情報を確認して処理を振り分ける事が可能です。
端末情報を取得し、ゲームプレイ
それでは端末情報の判定ができるようになりましたので、そのプログラムをベースプログラムの Flappy Bird にセットしてみたいと思います。
function isSmartPhone() {
    if (navigator.userAgent.match(/iPhone|Android.+Mobile/)){
        //スマホ画面向きの確認
        if (Math.abs(window.orientation) == 90) {
            // 横向き ゲーム・スタート
            draw();
        } else {
            // 縦向き 横にしよう
            alert('画面を横にするとスタートできるよ');
        }
    } else{
        // PC ゲーム・スタート
        draw();
    };
}
isSmartPhone();
上図のコードを今確認する
<!--
ベース
-->
<!DOCTYPE html>
<html lang="ja">
<head>
    <meta charset="UTF-8" />
    <title>Flappy Bird</title>
    <meta name="viewport" content="width=device-width, user-scalable=no">
    <style>
    canvas{
        background-color:#eee;
    }
    body{
        max-width:900px;
        margin:0 auto;
        text-align:center;
    }
    .button {
        display: none;
        vertical-align: middle;
        text-align:center;
        margin:32px;
    }
    .button div {
        display: inline-block;
        border-radius: 50%;
    }
    .button div:hover .up{
        border: 0.5em solid #e74c3c;
    }
    .button div:hover .up:after {
        border-top: 0.5em solid #e74c3c;
        border-right: 0.5em solid #e74c3c;
    }
    .up {
        display: inline-block;
        width: 4em;
        height: 4em;
        border: 0.5em solid #333;
        border-radius: 50%;
        margin-right: 1.5em;
    }

    .up:after {
        content: '';
        display: inline-block;
        margin-top: 1.3em;
        /*margin-left: 0.6em;*/
        width: 1.2em;
        height: 1.2em;
        border-top: 0.5em solid #333;
        border-right: 0.5em solid #333;
        -moz-transform: rotate(-45deg);
        -webkit-transform: rotate(-45deg);
        transform: rotate(-45deg);
    }

    /*canvasの上にボタンをフロート*/
    .content{
        display:inline-block;
        position:relative;
    }
    .content div {
        position:absolute;
        bottom:5px;
        right:5px;
    }
    /*canvasの上にボタンをフロート おわり*/
    @media (max-width:900px){
        .button {
            /*display: inline-block;*/
            display: inline-block;
            vertical-align: middle;
            text-align:center;
            margin:32px;
        }
    }
    </style>
</head>
<body>
<div class="content">
    <canvas id="canvas" width="500" height="300"></canvas>
    <div id="upButton" class="button">
        <div>
            <span class="up"></span>
        </div>
    </div>
</div>

<script>
    var cvs = document.getElementById("canvas");
    var ctx = cvs.getContext("2d");

    var bg = new Image(); //背景
    var bird = new Image(); //鳥
    var fg = new Image(); //地面
    var pipeNorth = new Image(); //ドカン上
    var pipeSouth = new Image(); //ドカン下

    bg.src = "bg.png";
    bird.src = "bird.png";
    fg.src = "fg.png";
    pipeNorth.src = "pipeNorth.png";
    pipeSouth.src = "pipeSouth.png";

    var bX = 30;  //鳥の表示値
    var bY = 20;  //鳥の表示位置
   var gap = 100;  //ドカンの縦幅
   var constant;
   var score = 0;

    var pipe = [];
    pipe[0] = {
        x : cvs.width, //canvas幅
        y : 0
    };

    // キーボード操作
    document.addEventListener("keydown",moveUp);
    function moveUp(e){
        bY -= 25;
    }
    // ボタン操作
    var upButton = document.getElementById("upButton");
    upButton.addEventListener("touchstart", touchButton);
    function touchButton(e){
        bY -= 25;
    }

    function reload() {
        location.reload();
    }

    function draw(){
        ctx.drawImage(bg,0,0);
        ctx.drawImage(bird,bX,bY);
        ctx.drawImage(fg,0,cvs.height - fg.height);
        for(var i=0 ; i < pipe.length; i++){
            constant = pipeNorth.height+gap;
            ctx.drawImage(pipeNorth,pipe[i].x,pipe[i].y);
            ctx.drawImage(pipeSouth,pipe[i].x,pipe[i].y+constant);
            pipe[i].x--;

            if( pipe[i].x == 300 ){  //ドカン左端位置が200進んだら(200 = canvas幅:500 - ドカン左端pipe[i].x 300)
                pipe.push({
                    x : cvs.width,
                    y : Math.floor(Math.random()*pipeNorth.height)-pipeNorth.height
                });
            }

            //ゲームオーバーのパターン
            if( bX + bird.width >= pipe[i].x && bX <= pipe[i].x + pipeNorth.width && (bY <= pipe[i].y + pipeNorth.height || bY+bird.height >= pipe[i].y+constant) || bY + bird.height >=  cvs.height - fg.height){
                ctx.fillStyle = "red"; //カラー
                ctx.fillText("ゲームオーバー", cvs.width/2, cvs.height/2); //表示内容、位置
                //setTimeout(reload, 3000);
            }
            if(pipe[i].x == bX){
                score++;
            }
        }
        bY += 1;

        ctx.fillStyle = "#000"; //カラー
        ctx.font = "16px"; //大きさ
        ctx.fillText("点数 : " + score + ' point',10,cvs.height-20); //表示内容、位置
        requestAnimationFrame(draw);
    }

    function isSmartPhone() {
        if (navigator.userAgent.match(/iPhone|Android.+Mobile/)){
            console.log('スマホだ!');
            //スマホ画面向きの確認
            if (Math.abs(window.orientation) == 90) {
                console.log('横向き!ゲーム・スタート');
                draw();
            } else {
                console.log('縦向き!横にしよう!');
                alert('画面を横にするとスタートできるよ');
            }
        } else{
            console.log('スマホじゃない、PCだ! ゲーム・スタート')
            draw();
        };
    }
    isSmartPhone();
</script>
</body>
</html>
ベース・プログラムの関数 draw() を実行すればゲームは始まりますので、それをスマホ 横 画面時とパソコン時にセット。スマホ 縦 画面時は、「横にしてね」 とアラート表示するようにしました。
実際に上記プログラムを実行してみるとわかるのですが、スマホ横画面、パソコン画面の場合はスムーズにゲーム開始できますが、スマホ縦画面時は画面を横にして、ページを再読み込みする必要があります。できれば横にしたら自動でゲームを開始して欲しいですよね。
スマホの画面向きに連動するJavaScriptプログラム
先程までのプログラムでは、ゲームを開始するように画面を横スクリーンにするようアナウンスはできましたが、横スクリーン後は自分で再読み込みする必要がありました。画面の向きを変えた後、自動で再読み込みするプログラムもありますので、こちらではそのコードをセット。
上図のコードを今確認する
<!--
画面横にした後急落下する対策
reload()
しかし、横にしない限りアラートが消えない
-->
<!DOCTYPE html>
<html lang="ja">
<head>
    <meta charset="UTF-8" />
    <title>Flappy Bird</title>
    <meta name="viewport" content="width=device-width, user-scalable=no">
    <style>
        canvas{
            background-color:#eee;
        }
        body{
            max-width:900px;
            margin:0 auto;
            text-align:center;
        }
        .button {
            display: none;
            vertical-align: middle;
            text-align:center;
            margin:32px;
        }
        .button div {
            display: inline-block;
            border-radius: 50%;
        }
        .button div:hover .up{
            border: 0.5em solid #e74c3c;
        }
        .button div:hover .up:after {
            border-top: 0.5em solid #e74c3c;
            border-right: 0.5em solid #e74c3c;
        }
        .up {
            display: inline-block;
            width: 4em;
            height: 4em;
            border: 0.5em solid #333;
            border-radius: 50%;
            margin-right: 1.5em;
        }

        .up:after {
            content: '';
            display: inline-block;
            margin-top: 1.3em;
            /*margin-left: 0.6em;*/
            width: 1.2em;
            height: 1.2em;
            border-top: 0.5em solid #333;
            border-right: 0.5em solid #333;
            -moz-transform: rotate(-45deg);
            -webkit-transform: rotate(-45deg);
            transform: rotate(-45deg);
        }

        /*canvasの上にボタンをフロート*/
        .content{
            display:inline-block;
            position:relative;
        }
        .content div {
            position:absolute;
            bottom:5px;
            right:5px;
        }
        /*canvasの上にボタンをフロート おわり*/
        @media (max-width:900px){
            .button {
                /*display: inline-block;*/
                display: inline-block;
                vertical-align: middle;
                text-align:center;
                margin:32px;
            }
        }
    </style>
    <script src="https://ajax.googleapis.com/ajax/libs/jquery/3.4.1/jquery.min.js"></script>
</head>
<body>
<div class="content">
    <canvas id="canvas" width="500" height="300"></canvas>
    <div id="upButton" class="button">
        <div>
            <span class="up"></span>
        </div>
    </div>
</div>

<script>
    var cvs = document.getElementById("canvas");
    var ctx = cvs.getContext("2d");

    var bg = new Image(); //背景
    var bird = new Image(); //鳥
    var fg = new Image(); //地面
    var pipeNorth = new Image(); //ドカン上
    var pipeSouth = new Image(); //ドカン下

    bg.src = "bg.png";
    bird.src = "bird.png";
    fg.src = "fg.png";
    pipeNorth.src = "pipeNorth.png";
    pipeSouth.src = "pipeSouth.png";

    var bX = 30;  //鳥の表示値
    var bY = 20;  //鳥の表示位置
   var gap = 100;  //ドカンの縦幅
   var constant;
   var score = 0;

    var pipe = [];
    pipe[0] = {
        x : cvs.width, //canvas幅
        y : 0
    };

    // キーボード操作
    document.addEventListener("keydown",moveUp);
    function moveUp(e){
        bY -= 25;
    }
    // ボタン操作
    var upButton = document.getElementById("upButton");
    upButton.addEventListener("touchstart", touchButton);
    function touchButton(e){
        bY -= 25;
    }

    function reload() {
        location.reload();
    }

    function draw(){
        ctx.drawImage(bg,0,0);
        ctx.drawImage(bird,bX,bY);
        ctx.drawImage(fg,0,cvs.height - fg.height);
        for(var i=0 ; i < pipe.length; i++){
            constant = pipeNorth.height+gap;
            ctx.drawImage(pipeNorth,pipe[i].x,pipe[i].y);
            ctx.drawImage(pipeSouth,pipe[i].x,pipe[i].y+constant);
            pipe[i].x--;

            if( pipe[i].x == 300 ){  //ドカン左端位置が200進んだら(200 = canvas幅:500 - ドカン左端pipe[i].x 300)
                pipe.push({
                    x : cvs.width,
                    y : Math.floor(Math.random()*pipeNorth.height)-pipeNorth.height
                });
            }

            //ゲームオーバーのパターン
            if( bX + bird.width >= pipe[i].x && bX <= pipe[i].x + pipeNorth.width && (bY <= pipe[i].y + pipeNorth.height || bY+bird.height >= pipe[i].y+constant) || bY + bird.height >=  cvs.height - fg.height){
                ctx.fillStyle = "red"; //カラー
                ctx.fillText("ゲームオーバー", cvs.width/2, cvs.height/2); //表示内容、位置
                //setTimeout(reload, 3000);
            }
            if(pipe[i].x == bX){
                score++;
            }
        }
        bY += 1;

        ctx.fillStyle = "#000"; //カラー
        ctx.font = "16px"; //大きさ
        ctx.fillText("点数 : " + score + ' point',10,cvs.height-20); //表示内容、位置
        requestAnimationFrame(draw);
    }

    function isSmartPhone() {
        if (navigator.userAgent.match(/iPhone|Android.+Mobile/)){
            console.log('スマホだ!');
            $(window).on('load orientationchange resize', function(){
                //スマホ画面向きの確認
                if (Math.abs(window.orientation) == 90) {
                    console.log('横向き!ゲーム・スタート');
                    draw();
                } else {
                    console.log('縦向き!横にしよう!');
                    alert('画面を横にするとスタートできるよ');
                    location.reload();
                }

            });
        } else{
            console.log('スマホじゃない、PCだ! ゲーム・スタート')
            draw();
        };
    }
    isSmartPhone();
</script>
</body>
</html>
jQuery を使った $(window).on('load orientationchange resize', function() をセットすることで、画面切り替え時の挙動を制御可能に。ただこれだけで十分な場合もありますし、今回のようなゲーム系では画面切り替え後に異常にゲームのスピードが上がる場合もあります。
この予期せぬ挙動変化、一つの解決方法としては画面切り替え後にキチンと再読み込みさせることで解決できたりします。横画面時の処理プログラム内に location.reload(); (上記コード 184行目)とすることで、画面切り替え後も安定してゲームが処理されていきますね。
さてこれで大体整ったように思える画面処理ですが、実際にスマホでゲーム画面を開いてみると画面上の "アドレスバー" が邪魔だたりします。このゲーム画面を狭める "アドレスバー" は、 "フルスクリーン" 処理することで解決可能。
ゲーム時は自動でフルスクリーン
まずはノーマルスクリーンとフルスクリーンを比較。
上図のコードを今確認する
<!DOCTYPE html>
<html lang="ja">
<head>
    <meta charset="UTF-8" />
    <title>Flappy Bird(フルスクリーン)</title>
    <meta name="viewport" content="width=device-width, user-scalable=no">
    <style>
    canvas{
        background-color:#eee;
    }
    </style>
</head>
<body>
<p><button onclick="openFullscreen();">フルスクリーン</button></p>
<div id="fullScreen">
    <canvas id="canvas" width="500" height="300"></canvas>
</div>

<script>
var canvasElement = document.getElementById("fullScreen");

function openFullscreen() {
    if (canvasElement.requestFullscreen) {
        //canvasElement.requestFullscreen();
        canvasElement.webkitRequestFullscreen();
        console.log('1');
    } else if (canvasElement.mozRequestFullScreen) { /* Firefox */
        canvasElement.mozRequestFullScreen();
        console.log('2');
    } else if (canvasElement.webkitRequestFullscreen) { /* Chrome, Safari and Opera */
        canvasElement.webkitRequestFullscreen();
        console.log('3');
    } else if (canvasElement.msRequestFullscreen) { /* IE/Edge */
        canvasElement.msRequestFullscreen();
        console.log('4');
    }
}
</script>
</body>
</html>
ノーマルバージョンでは画面の 6分の 1 ぐらいをアドレスバーが占めるのに対して、フルスクリーンの方はゲームの canvas 画面以外表示することなくスッキリとゲーム画面を出力することが可能。 今回のような横スクロールゲームでは、明らかにフルスクリーンの方が ○ ですよね。
このフルスクリーン処理を既存の Flappy Bird プログラムに加えてセットしてみます。
【フルスクリーン処理について】
JavaScript による画面のフルスクリーン処理は、関数: requestFullscreen() で実行されますが、ブラウザ毎にその機能は違ってきます。
例えば、 W3School.com などのドキュメントでは Google Chrome の場合は requestFullscreen() もしくは webkitRequestFullscreen() 、 FireFox の場合は mozRequestFullScreen() などブラウザによって違ってきます。
そのため "フルスクリーン処理" という一つの処理を行うのにも十数行のプログラムが必要に。
上図のコードを今確認する
<!--
一応完成
-->
<!DOCTYPE html>
<html lang="ja">
<head>
    <meta charset="UTF-8" />
    <title>Flappy Bird</title>
    <meta name="viewport" content="width=device-width, user-scalable=no">
    <style>
        /*
        canvas{
            background-color:#eee;
        }
        */
        body{
            max-width:900px;
            margin:0 auto;
            text-align:center;
        }
        .button {
            display: none;
            vertical-align: middle;
            text-align:center;
            margin:32px;
        }
        .button div {
            display: inline-block;
            border-radius: 50%;
        }
        .button div:hover .up{
            border: 0.5em solid #e74c3c;
        }
        .button div:hover .up:after {
            border-top: 0.5em solid #e74c3c;
            border-right: 0.5em solid #e74c3c;
        }
        .up {
            display: inline-block;
            width: 4em;
            height: 4em;
            border: 0.5em solid #333;
            border-radius: 50%;
            margin-right: 1.5em;
        }

        .up:after {
            content: '';
            display: inline-block;
            margin-top: 1.3em;
            /*margin-left: 0.6em;*/
            width: 1.2em;
            height: 1.2em;
            border-top: 0.5em solid #333;
            border-right: 0.5em solid #333;
            -moz-transform: rotate(-45deg);
            -webkit-transform: rotate(-45deg);
            transform: rotate(-45deg);
        }

        /*canvasの上にボタンをフロート*/
        .content{
            display:inline-block;
            position:relative;
        }
        .content div {
            position:absolute;
            bottom:5px;
            right:5px;
        }
        /*canvasの上にボタンをフロート おわり*/
        @media (max-width:900px){
            .button {
                /*display: inline-block;  PC時はフルスクリーン不要なため none に */
                display: none;
                vertical-align: middle;
                text-align:center;
                margin:32px;
            }
        }
    </style>
    <script src="https://ajax.googleapis.com/ajax/libs/jquery/3.4.1/jquery.min.js"></script>
</head>
<body>
<p><button onclick="openFullscreen();" id="startButton">START</button></p>
<div class="content" id="fullScreen">
    <canvas id="canvas" width="500" height="300"></canvas>
    <div id="upButton" class="button">
        <div>
            <span class="up"></span>
        </div>
    </div>
</div>

<script>
    var cvs = document.getElementById("canvas");
    var ctx = cvs.getContext("2d");

    var bg = new Image(); //背景
    var bird = new Image(); //鳥
    var fg = new Image(); //地面
    var pipeNorth = new Image(); //ドカン上
    var pipeSouth = new Image(); //ドカン下

    bg.src = "bg.png";
    bird.src = "bird.png";
    fg.src = "fg.png";
    pipeNorth.src = "pipeNorth.png";
    pipeSouth.src = "pipeSouth.png";

    var bX = 30;  //鳥の表示値
    var bY = 20;  //鳥の表示位置
   var gap = 100;  //ドカンの縦幅
   var constant;
   var score = 0;

    var pipe = [];
    pipe[0] = {
        x : cvs.width, //canvas幅
        y : 0
    };

    // キーボード操作
    document.addEventListener("keydown",moveUp);
    function moveUp(e){
        bY -= 25;
    }
    // ボタン操作
    var upButton = document.getElementById("upButton");
    upButton.addEventListener("touchstart", touchButton);
    function touchButton(e){
        bY -= 25;
    }

    function reload() {
        location.reload();
    }

    function draw(){
        ctx.drawImage(bg,0,0);
        ctx.drawImage(bird,bX,bY);
        ctx.drawImage(fg,0,cvs.height - fg.height);
        for(var i=0 ; i < pipe.length; i++){
            constant = pipeNorth.height+gap;
            ctx.drawImage(pipeNorth,pipe[i].x,pipe[i].y);
            ctx.drawImage(pipeSouth,pipe[i].x,pipe[i].y+constant);
            pipe[i].x--;

            if( pipe[i].x == 300 ){  //ドカン左端位置が200進んだら(200 = canvas幅:500 - ドカン左端pipe[i].x 300)
                pipe.push({
                    x : cvs.width,
                    y : Math.floor(Math.random()*pipeNorth.height)-pipeNorth.height
                });
            }

            //ゲームオーバーのパターン
            if( bX + bird.width >= pipe[i].x && bX <= pipe[i].x + pipeNorth.width && (bY <= pipe[i].y + pipeNorth.height || bY+bird.height >= pipe[i].y+constant) || bY + bird.height >=  cvs.height - fg.height){
                ctx.fillStyle = "red"; //カラー
                ctx.fillText("ゲームオーバー", cvs.width/2, cvs.height/2); //表示内容、位置
                break;
            }
            if(pipe[i].x == bX){
                score++;
            }
        }
        bY += 1;

        ctx.fillStyle = "#000"; //カラー
        ctx.font = "16px"; //大きさ
        ctx.fillText("点数 : " + score + ' point',10,cvs.height-20); //表示内容、位置
        requestAnimationFrame(draw);
    }

    // ゲーム開始に伴うフルスクリーンのトリガー
    var canvasElement = document.getElementById("fullScreen");

    function isSmartPhone() {
        if (navigator.userAgent.match(/iPhone|Android.+Mobile/)){
            console.log('スマホだ!');
            //$(window).on('load orientationchange resize', function(){ //横から縦に変えた時の処理プログラム内でリロードするのでこのコードはなくてもOK
                //スマホ画面向きの確認
                if (Math.abs(window.orientation) == 90) {
                    console.log('横向き!ゲーム・スタート');
                    document.getElementById("upButton").style.display = "inline-block"; // 最初のスタートボタン消す
                    draw();

                } else {
                    console.log('縦向き!横にしよう!');
                    alert('画面を横にするとスタートできるよ');
                    location.reload();
                }

            //});
        } else{
            console.log('スマホじゃない、PCだ! ゲーム・スタート')
            draw();
        };
    }

    function openFullscreen() {
    // doc  https://www.w3schools.com/jsref/met_element_requestfullscreen.asp
    if (canvasElement.requestFullscreen) {
        //canvasElement.requestFullscreen();
        canvasElement.webkitRequestFullscreen();
        console.log('1');
    } else if (canvasElement.mozRequestFullScreen) { /* Firefox */
        canvasElement.mozRequestFullScreen();
        console.log('2');
    } else if (canvasElement.webkitRequestFullscreen) { /* Chrome, Safari and Opera */
        canvasElement.webkitRequestFullscreen();
        console.log('3');
    } else if (canvasElement.msRequestFullscreen) { /* IE/Edge */
        canvasElement.msRequestFullscreen();
        console.log('4');
    }
    document.getElementById("startButton").style.display = "none";
    isSmartPhone();
    }

    //isSmartPhone();
</script>
</body>
</html>
ボタン:ゲームスタート を押すことでフルスクリーンのトリガーを引き、その後に端末環境の処理、ゲーム処理をセットしてみました。
最初に関数: openFullscreen() でフルスクリーン、次に関数: isSmartPhone(); で端末環境、 そして最後にゲーム関数: draw(); という流れです。
iPhone お使いの方では、連続タップすると画面がズームされるかもしれません。気になる方は こちら のコードと比較してみて下さい。
順を追って見ていけば大丈夫なプログラム処理と思いますが、いきなりこのようなプログラムを見ると...チョットしんどいですよね。またこのゲームにはゲームオーバー後のリトライの機能がありません。今回のような横スクロールゲームについては、リトライに対して単に location.reload(); をつければ OK というわけではないので、改めてリトライ用のプログラムを用意する必要があるでしょう。
フルスクリーン機能については、iOS のバージョン 13系で動くことを確認しています。一つ前の iOS 12 系では反応しないと思います。 iPhone 5s などをお使いの方、ご了承下さい。
\Webサイト担当者としてのスキルが身に付く/
まとめ
ゲームを操作する方としてはなんともないような初期設定の操作も、プログラム側から見てみるとちょっと複雑ですよね。
最初は難しそうに見える JavaScript のプログラムも、今回のように順を追って見ていくとどうでしょうか? とりあえずコードをコピペして、ブラウザで動かして、それからプログラムの意味を理解していくのでも全然 OK と思います。恐らく何も手を動かさずに、なんとなく分かったような気分になるのが一番 ❌ なんでしょうね。
「JavaScript以前にプログラムを書くための ファイル操作 は?」、 「スマホ用のゲームだったら Swift や Java の方が いい?」 頭のなかをグルグルしているその思いを、一度 CodeCamp にぶつけてみてください。無料体験を通じて先生に聞いてみるもよし、LINE で質問するもよし。まずは今より一歩前に前進してみませんか?

- この記事を書いた人
- オシママサラ


